Nice work! I have not done a vert in my v1s in over a yr and a half but I may revisit this for fun! 1st question would be how high did you position this? (bottom wire or bottom of the coil in relation to the lower post hole). 2nd What do you use for a key ( if any) on setting the angle? BTW thats a nice touch that I am sure also aids in setting the wick which was a PIA when I mounted them straight up! 3rd No vape band? So two holes hitting direct or lining two holes aimed at the sides? Or… You just wanted to take a pick omitting the only shortcoming of this atty 
2 Likes
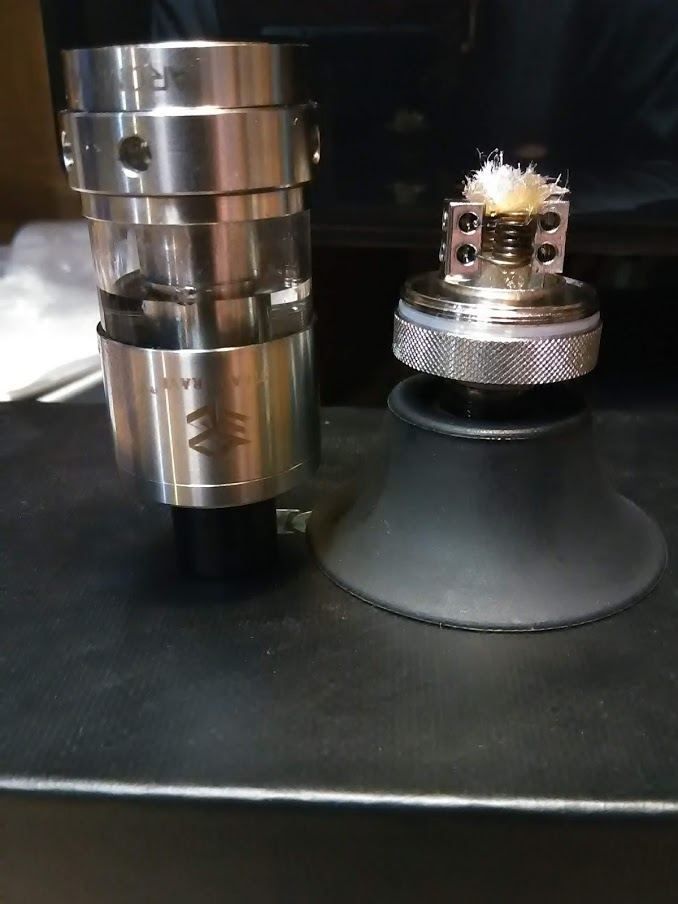
@xxanalogxx good questions. The angle isn’t really specific, just slightly cocked to allow for easier wicking. Height of the coils to the air holes, I’ve never really had any issues with, and just kind of set it and forget it, as the Steam Crave just makes good damned flavor wherever they are. I had the vape band on waaaaaay back when I first tried it, used it for a bit, and found with the more restrictive airflow (v.1 vs. other versions) I ended up leaving it wide open anyway, so the band became not necessary. Even though it’s older, and a version 1, I can’t stop using it for all of my SF testings.
2 Likes
Thanks man!(@SessionDrummer) That’s a beautiful and easy to follow step by step. Only problem is, i’ve done that EXACTLY. I’m really starting to think I must have a badly produced tank… Even with half that cotton not even touching the deck floor, that thing wont wick. If i block the air holes and suck, it makes a huge “squirrlllkkk” sound and either leakes and/ or wets my skimpy cotton once. I have seriously tried 3 dozen times with 3 types of cotton and almost exactly the same results. With a reasonable amount of cotton (like your demo) fluffed out and gently laying in the base, it does’nt leak but simply wont bubble at all unless i suck then “squirlk” and a giant bubble. Is it suppose to have a spacer under the deck? It’s very close tolerance. I even tried turning the contact pin in once assembled to gain about 1/4 thread, that might have helped ever so slightly or I imagined it…lol. I’m gonna try again tomorrow. If it still does’nt wick, it’s time to make those juice holes an itty bit bigger. What have i got to lose! Thanks again for all your help and advice. We will solve this!
2 Likes
Although I don’t have your exact model, and you can rule out the brand of cotton, then maybe there is something up with your tank.
2 Likes
I have several tanks and I always get the rba’s for em’. (Sub tank mini, tfv8 baby). I’m used to picky to wick. This thing has me stumped…for now. I believe it’s just a v1. The only place it says" sc200" is on the box. It’s serial number 49k something. Says “Aromamizer rbta” and “steam crave”. It was cheap (like $12). Maybe a clone/knockoff?
2 Likes
What is the VG ratio of your juice?
1 Like
Around 70/30
1 Like
That should wick even if its slow. Too much cotton will be your enemy and judging by pics is difficult to do because the camera always gives an altered perception. I really cannot comment on how to wick verts as it was a hit or miss thing for me in the past but it was the best flavor build when you get it right!
3 Likes
Late to party but @BikesAndBacon made me https://vapenw.com/products/aromamizer-rdta-v2-by-steam-crave?_pos=1&_sid=bc8a12d5c&_ss=r for 10 bucks worth a try


5 Likes
@worm1 Chooo Choooo … All aboard !!!
Loving the verticals. Let me know if you have any issues.
6 Likes

Hey SD…, does it matter which post holes I use for positive & negative?, b/c I have saw some using the top hole on the left post & the bottom on the right & then vice versa… I would greatly appreciate your help on this, as I’m not sure & I figured TheSteamCraveGuy would have the best answer;)…
2 Likes
Oh, I’ll be the FIRST GUY to agree @St3v0, that I’m always SURE, I’m giving bestest best answers. Whether or not that’s true, remains to be seen.
OK, let’s make it simple, as life (at least in 2020) is just too damned hard.
OK, one post is positive, the other is negative. It doesn’t matter that we know which is which. When the wire(s) are connected across both posts, then current will flow between them, easy mcpeasy.
OK, now, as to the whole upper hole goes to the lower hole, and vice versa, YES, that is how I run mine, and here’s why.
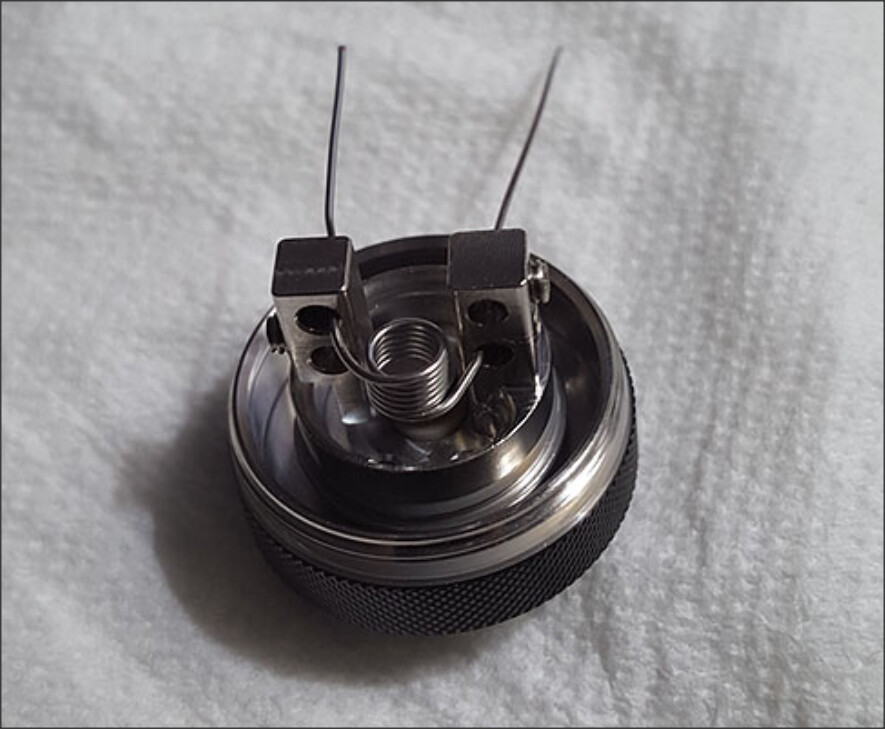
For every wrap of your coils (I use 7 wraps), the coils get thicker (duh), and the leads space themselves further apart. If you look at the picture above, the one lead is in the top left port, and the other side is in the bottom right. That is typically done, because it’s the natural landing place FOR the coil leads. Sure, sure, you could mashy mash the wires all up and match top to top, and bottom to bottom, but it wouldn’t look good, would be hard to mangle into place, and would make very EASY to have dead shorts (bad) on your leads.
So, don’t sweat which is positive or negative, and be assured, no matter what holes you use, when a coil is connected to EACH side (post), current will flow between them, through the coil.
Hope this helps.
9 Likes
Thank u very much! I wanted to do a vertical build with pre-made coils & they wouldn’t work left top & bottom right!
4 Likes
I found out right away that horizontal coils didn’t work well with the V2 RDTA. In order to use two airflow holes on each side, vertical coils pretty much HAS to be done. I tried and tried and no matter what I did, one of the airflow holes would be blocked. It got blocked by the deck post, or the cotton no matter which way I spun the deck. The one airflow hole setting works fine but I wanted the two hole setting.
I posted this before here but vertical coils is the way to go with this tank if you expect to use two airflow holes (on each side). The way it’s designed doesn’t work well for the two airflow holes open and a horizontal builds.
3 Likes
what wire please ss ka … AWG final resistance and diameter?
you dont mean that ![]()

ok its that way

4 Likes
I’ve tried to get behind SS, Ni, and even Ti, but I always just ended up right back at Kanthal.
7 Likes
Same here. 24g kanthal, 7 wraps spaced and 3.5 mm I.D. I have been building horizontal rather than vertical as it’s a little easier for me to wick. As long as the top of the coil sits just over the top of the posts, flavor ensues!
EDIT: Hello beautiful peoples!
8 Likes