I’m no expert, but the way I understand it:
Since your voltage increases, you’re having to push fewer amps … so it’s the same as adding the mAh’s together.
I’m talking here about regulated mods… i don’t know about mechs.
Just read this, it should light your lamp.
After reading all this, I looked at my batteries and it got me thinking. Maybe I should update too lol.
Last time I bought a bunch of batteries (48 to be precise) was around 2? Years ago or something like that.
I use the hohm base charger from hohm tech and once every 3 month I run it through the battery doctor etc.
Don’t have an issue with them not charging correctly etc. and they last me a full day, sometimes longer depending on device.
Only problem some have a tiny nick in the wrap on the top, nothing major so, and yes I should rewrap lol
But anyways, maybe some newer “better” batteries might be in order. Might look at the LG’s, my current ones are samsung.
Thanks everyone for taking the time to recommend batteries. Much appreciated.
I have the green Samsung 25 R. I never have problems with those. I have been vaping for 4 years and I still have the first set of 10 I got from Amazon. I get a full day at medium vape level of usage.
you would have to know more info about your which battery size, device, watts,etc before recommending
https://www.e-cigarette-forum.com/blogs/mooch.256958/
General tips (to no one in particular)
The best thing you can do (once you’ve determined your preferred vaping style) with respect to batteries and battery life is:
-
Buy major brand name batteries from a reputable source. This minimizes the chance of receiving fakes, or even legit but factory seconds (lower grade).
-
Select a battery by the CDR rating that’s closest to (but NOT under) your needs.
Ex1: if you vape at 13amps (power and impedance vary, so do the math please!) then you’re most likely going to maximize battery life (both in power delivery, and longevity) by using a 15a battery.
Ex2: if you vape at 18a, then you’re most likely to maximize by using a 20a battery.
Ex3: if you vape at high power settings… You’re almost always best using 30a batteries. Just for the additional safety factor if nothing else!
For instance, I use a very unique method of building/wrapping my 0.17-0.19ohm coils (SS), but typically only run between 32-40w. They get up to temp ultra fast, but still usually only consume around 15 amps.
The reason I mention this is because I used LG HG2’s (browns) and Samsung 25r5’s during the first two years.
The LG’s were great in less-efficient mods (typically because of the inefficiency, and the LG’s had power to spare/or “waste” without affecting the vape). While the 25r5’s performed better in higher efficiency mods. Durations of use were similar, though with a slight edge to the LG’s during the first 6-8 months. Later in their life span, the Samsungs gained the edge.
However, when I changed to using the Samsung 30q’s, the tracked lifespan (in length of time between charges) dramatically increased over the 25r5’s for me and because of my load, draw style, etc.
So, bottom line, one should really tailor the battery to the application. After all, that’s why they are rated the way they are, and have the associated lifespan (in mah). It’s meant to be “as an example of lifespan, in a similar application”. And that’s something that many either don’t understand, often forget about, or simply aren’t aware of! 
Hope this helps someone (anyone) to get a better understanding of why there’s so many options out there!
A quick question on this.
I have a valyrian 2 kit with 3 x 18650 mod, it goes to 300w so most likely in series.
Top amps with the coils available for tank is 25.9A.
I am running Samsung 20s (30A and 2000mah.)
Would it be safe / improve battery life to get lower A batteries as there is 3 of them.
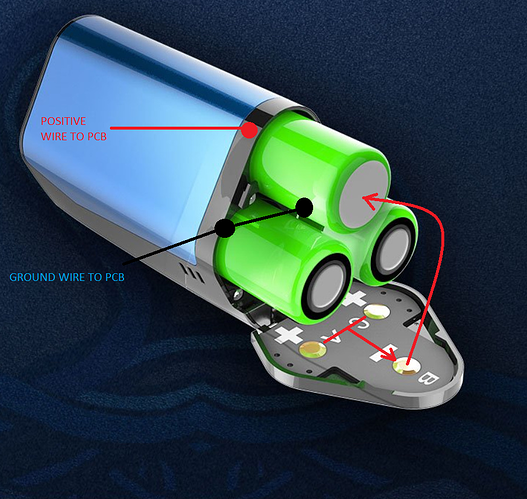
It looks like a series-parallel mod to me (judging by the picture). In which case, given the current is divided between the two paths, the weakest link should always be your strongest consideration.
Given that batteries are recommended to be married (used as a matched set when there’s more than one in use in the same device), I would recommend using nothing less than a set of 25a batteries. And honestly, I’d suggest 30a batteries since it’s purportedly supposed to deliver 300w.
Whether it actually delivers that or not is immaterial to me personally. I always try to bare in mind the ‘what if’ moments… Because I’ve seen them (personally) happen. For instance, you’re carrying the mod, and it wasn’t locked or turned off, and the + button gets pushed without your realizing, and you go to fire it thinking “it’s still set where I left it” only to find its set to max temp (or God forbid, worse: max power) and you’re unexpectedly putting full juice through the device (and coil, etc).
In my opinion, Even if you don’t use it at levels near the max one should still be mindful of what CAN happen, and minimize the chances of things going wrong. Which also means maximizing chances for safety. To me, there is no separating the two in an example such as this. ![]()
Now, with that said, I do run Samsung 30Q’s in my Smoant Cylons.
However, while they are a “218w” device, I never run them in power mode unless I’m putting a new coil on and getting rid of hotspots (in which case, I’m only using 12w, which then gets set back into TC mode the instant I’m done.) I also never exceed the power available from those batteries (or even a single one) which as you pointed out (rightfully so) the coil plays an important role.
It would take a HUGELY unlikely chain of events (right combination of button presses) to change the power while in TC mode. And even though it’s not impossible, I still have to accept the risk of my choice. 
How you use a device, and the overall design of the device (down to the way the options that selections are made, and settings are applied) should always be considered.
Hope this helps.
Does it really with a regulated mod? I’ve read mixed opinions so I’m confused to what the facts really are.
The site where I buy my batteries, fogstar.co.uk, is pretty reputable and they don’t take the coil in consideration when calculating what amps batteries you need on a regulated mod.

I do.
And without having the mod in front of me to disassemble and verify that, I put my opinion forth based on what I see (and noting such as a disclaimer, not a guarantee of fact).
Thanks for the video link though.
IMO it does. As it CAN (is supposed to) directly dictate the load seen by the mod, assuming everything is working properly within the mod.
You can only prepare against the things you are aware of in my experience. We’re all at the mercy of the unknown.
they don’t take the coil in consideration when calculating what amps batteries you need on a regulated mod.
I’m not going to get into “what others do” with you.
There’ve been several examples of regulated mods having issues over the years. You take the precautions you see fit, and I’ll do the same.
Sorry if it wasn’t clear. I was asking because I don’t, kinda hoping you could explain 
I was asking because I don’t, kinda hoping you could explain
I apologise. I thought you were having another go at me (by the way it was phrased, and after you politely asked me to “butt out” of another thread recently…)
I still haven’t had time to watch the video, and there may be something telling there (if he did a complete field strip)…but for the moment, I’m continuing to go on the picture (until I can watch the video on a solid connection).
In most of the mods I’ve seen (I’ve only been inside of a couple of three battery mods), the battery door connectors have not had a physical wire connection point. Normally, they’re one solid piece of metal, that connects whatever (everything that) contacts the connection points.
Which if that were the case with the pic I previously posted, would eliminate there being a need for a connecting wire that would go into the battery door, and would be a weak point, thanks to the flex-stress induced onto the wire from repeatedly opening and closing the door (changing batteries).
In fact, that’s the whole reason that most two battery mods use the little spring-loaded pressure contact in between the two batteries on the door. It eliminates the need for a wire going to the battery door contact bridge.
The sensor wire is hidden internally, but still makes it’s connection to the spring loaded piston as seen in the center, with it’s connection point in the center of the battery door (which in the case of the Alien, Cylon, and many others, is a single contact bridge bar inside the door, with no physical wiring to the mod through the door channel). Basically, the three ‘separate’ contact points seen on the door, are all one piece of metal. Intentionally covered by the material on top of them, to effectively shrink the surface area exposed to the battery contact points, so that IF a damaged wrap were in play…chances of creating an area to short would be further minimized than simply leaving the entire connecting bridge (underneath) exposed.
If they have in fact used a unique design of the battery bridge on this device (entirely possible), I’d be surprised as it’s unlikely due to fact that I would expect them to “have to” run a connecting wire through the flex-point of the door…I can’t currently picture any other way to do so offhand. And NO, this isn’t calling out DJLSB, saying he’s wrong (about what whatever is said in the video), etc. I’m simply saying that I haven’t seen it yet, and I can’t picture that being the case. I’m always open to learning something new, as well as being wrong.
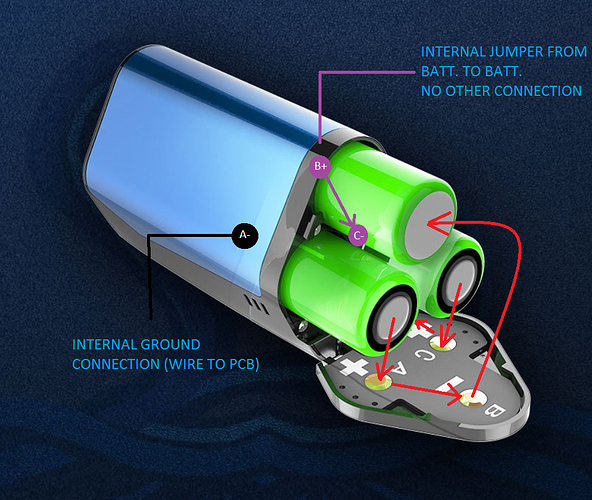
But even drawing this out as a series circuit…
In my example above, there would be a ground connection expected (going to the pcb) at the negative side of battery A.
And a return wire (positive point of contact to complete the circuit) at “C+” (on the battery door). Which in effect means that there would have to be a wire going through the door channel.
Even if it was reversed (meaning: I drew it backwards), there would have to be a phsyical wire connected to “A+” going to the positive lead on the pcb (through the door channel). But there could be no connection between C and A on the battery door at any point, as that would create a parallel connection.
In which case, it would be a design flaw IMHO (as I would expect the life of the wire running through the battery door would dramatically shorten the expected useful life of the mod), or I’m wrong, it simply wasn’t done that way. In which case, again, I simply don’t have enough information to attempt a guess. I would need to have the mod in front of me to figure out exactly what’s being done.
What I would normally expect would be the following:
Hopefully this helps clear up what I was thinking, and why.
If I can get a decent enough connection to watch video on my phone, I’ll try and update if I find what I’m not getting, or was flat out wrong about.
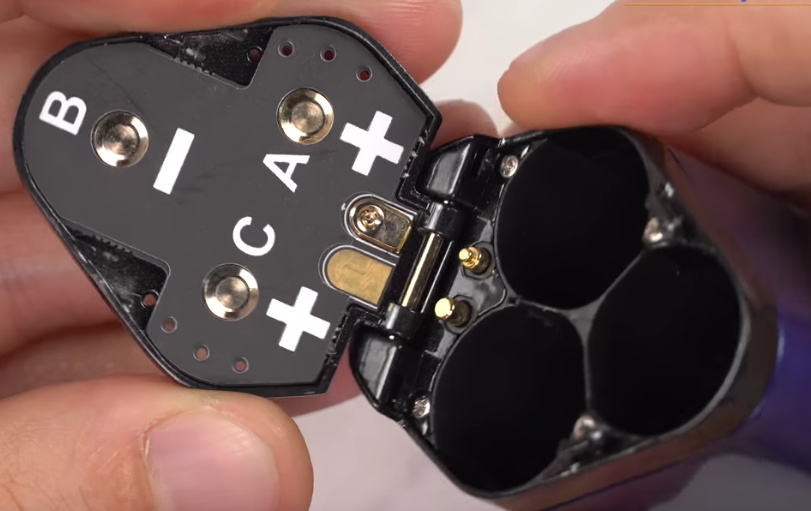
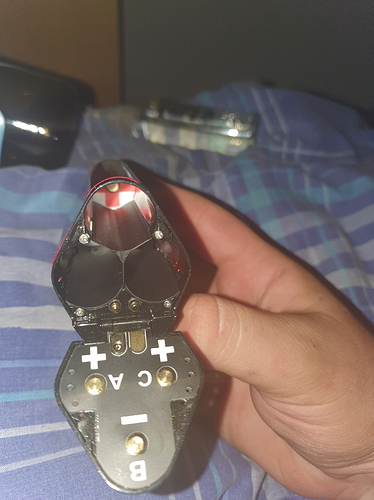
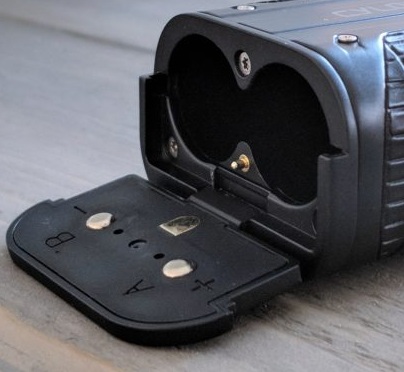
I didn’t quite see how it works in the video, but here’s a better picture of the door. Instead of the 1 pin (which I always thought was for balanced charging, even though I don’t get how it works), this mod has 2 pins. Maybe there’s a separation between the metal in the door that connects A/B and C? If that’s the case your first drawing would probably be accurate. No additional wiring required with the additional pin.
here’s a better picture of the door
Thank you!
Great shot by the way.
The picture is slightly fuzzy around the other “shiny areas” (around the main mod, which faces the door), but I’m going to assume [gulp] that those are screws…since there are no mating points of contact in the battery door.
Instead of the 1 pin (which I always thought was for balanced charging, even though I don’t get how it works)
Under ‘normal’ circumstances, it is the pin that’s used to monitor the batteries (which is why I frequently refer to it as the “sensor” wire).
Because, the monitoring pin is located on the bridge (between the two batteries) depending on how the cpu switches the monitoring circuit (in other words, which battery it is sampling the voltage from) it allows the electronics to know which battery is at what point of progression during the charging process.
this mod has 2 pins
So it does!
Which would imply to me that they aren’t able to monitor each battery individually, but rather, appear to be using those two points of contact to facilitate the series connection. But again, this is educated guessing. Not an assertion of fact.
If they use those two contact points to effect a series connection, in conjuction with a custom bridge, things do seem to fall in line with the first sketch I submitted above. As the assumed (spring loaded) points of contact would be relative to points A and C, with a bridge between either A & B or C & B.
No additional wiring required with the additional pin.
You got it!
I my hate guessing about such things (even educated guessing), as I try my damnedest to stay with factual statements… But I also want to try and help others gain a better understanding. Sometimes the two cross, which point I try to help to the best of my ability and understanding, but I try to make sure that folks understand which point of view I’m coming from (fact vs theory and/or educated guessing). I apologize for the times when I may fall short of this.
It was just a screenshot from DJ’s video, not taking credit for it. You’ll get a better idea if you have a look at it when you have the chance.
Anyways, thanks for the explanation. I think I better understand how these things work now.
Wow that wend alot deeper then i expected.
Thanks both of you for the info and time.
Ps the other bits opposite door are screws

