I just remembered something I wanted to bring up in my original reply. Breathing. Breathing is only required when your e-liquid contains flavorings that are diluted in alcohol. Otherwise it is optional. However for most flavors I wouldn’t recommend it. Some flavors, such as most strawberries for example, are highly volatile. In other words the flavor isn’t tightly locked in place by the PG, thus breathing will cause them to lose intensity. In most cases you get a good portion of the benefits of breathing during the measuring process, ie drawing a flavor, putting it in the bottle, moving on to the next. Most videos I have viewed have said that breathing is a must which simply isn’t true and can lead you to using more of certain flavors when compared to not breathing.
I absolutely agree with everything you said bar this, I would say > IF you think breathing is necessary then it is only required when your e-liquid contains flavorings that are diluted in alcohol.
I do not breath anything, ever due to
I arrived there after a conversation I had with @Walt_RealFlavors who recommended that mixes be mixed and capped immediately after mixing (not an exact quote) .
I guess the breathing debate will continue along the lines of mixing by volume, heating mixes, storing flavours we all do it our own way and there is nothing wrong with that. I would suggest that the bottle breathers try capping a bottle immediately after mixing and breathing the same mix as you normally would to see if there is a difference.
It seems simple to me …if your smelling it while stored or during steeping/mixing, you won’t be tasting it in your e-juice …it’s gone
Yes it is a no brainer yet just the other day I saw advice being handed out to a new mixer breath every mix for a minimum of 12 hours (it wasn’t here) SMH.
I have tried this experiment a few times in the past. I found that with breathing I had to use about 20% more (say 7% instead of 5%) when using strawberry flavorings and about 10% more when using certain bananas. Some pastries held up pretty well, others started to taste off. Might have been my imagination, but they started tasting…well…fake and almost plastic like.
I have done the same tests with sb, nana, raspberry and apple and come to a similar conclusion.
@Jmartian I apologize for the slow reply.
Opinions do vary on this subject. The most anal retentive among us will want the specific gravity. Others will go by 1 gm = 1 ml. IMO it doesn’t matter. You will always get the same results if you stick with either method. It’s a matter of consistency. The biggest difference (from the mixer’s standpoint) is with specific gravity, you have to get this information from somewhere. So either you simply trust whatever you find from the manufacturer, or you weigh each flavor and enter your findings. Either way, has it helped in any way to get the most accurate wt/gm? Not for you.
Bottom line - the easiest method of mixing by weight which is 100% repeatable is valuing all flavors as 1gm/ml IMO. It’s consistent and easy. Sure, this is a topic of contention, but I’ve yet to see a solid argument against it for the DIY hobbyist.
I’m still not completely sold on ME mixing by weight, bAsed on my personal experience so far…
But will admit I am quickly leaning towards the scale . The more I read.
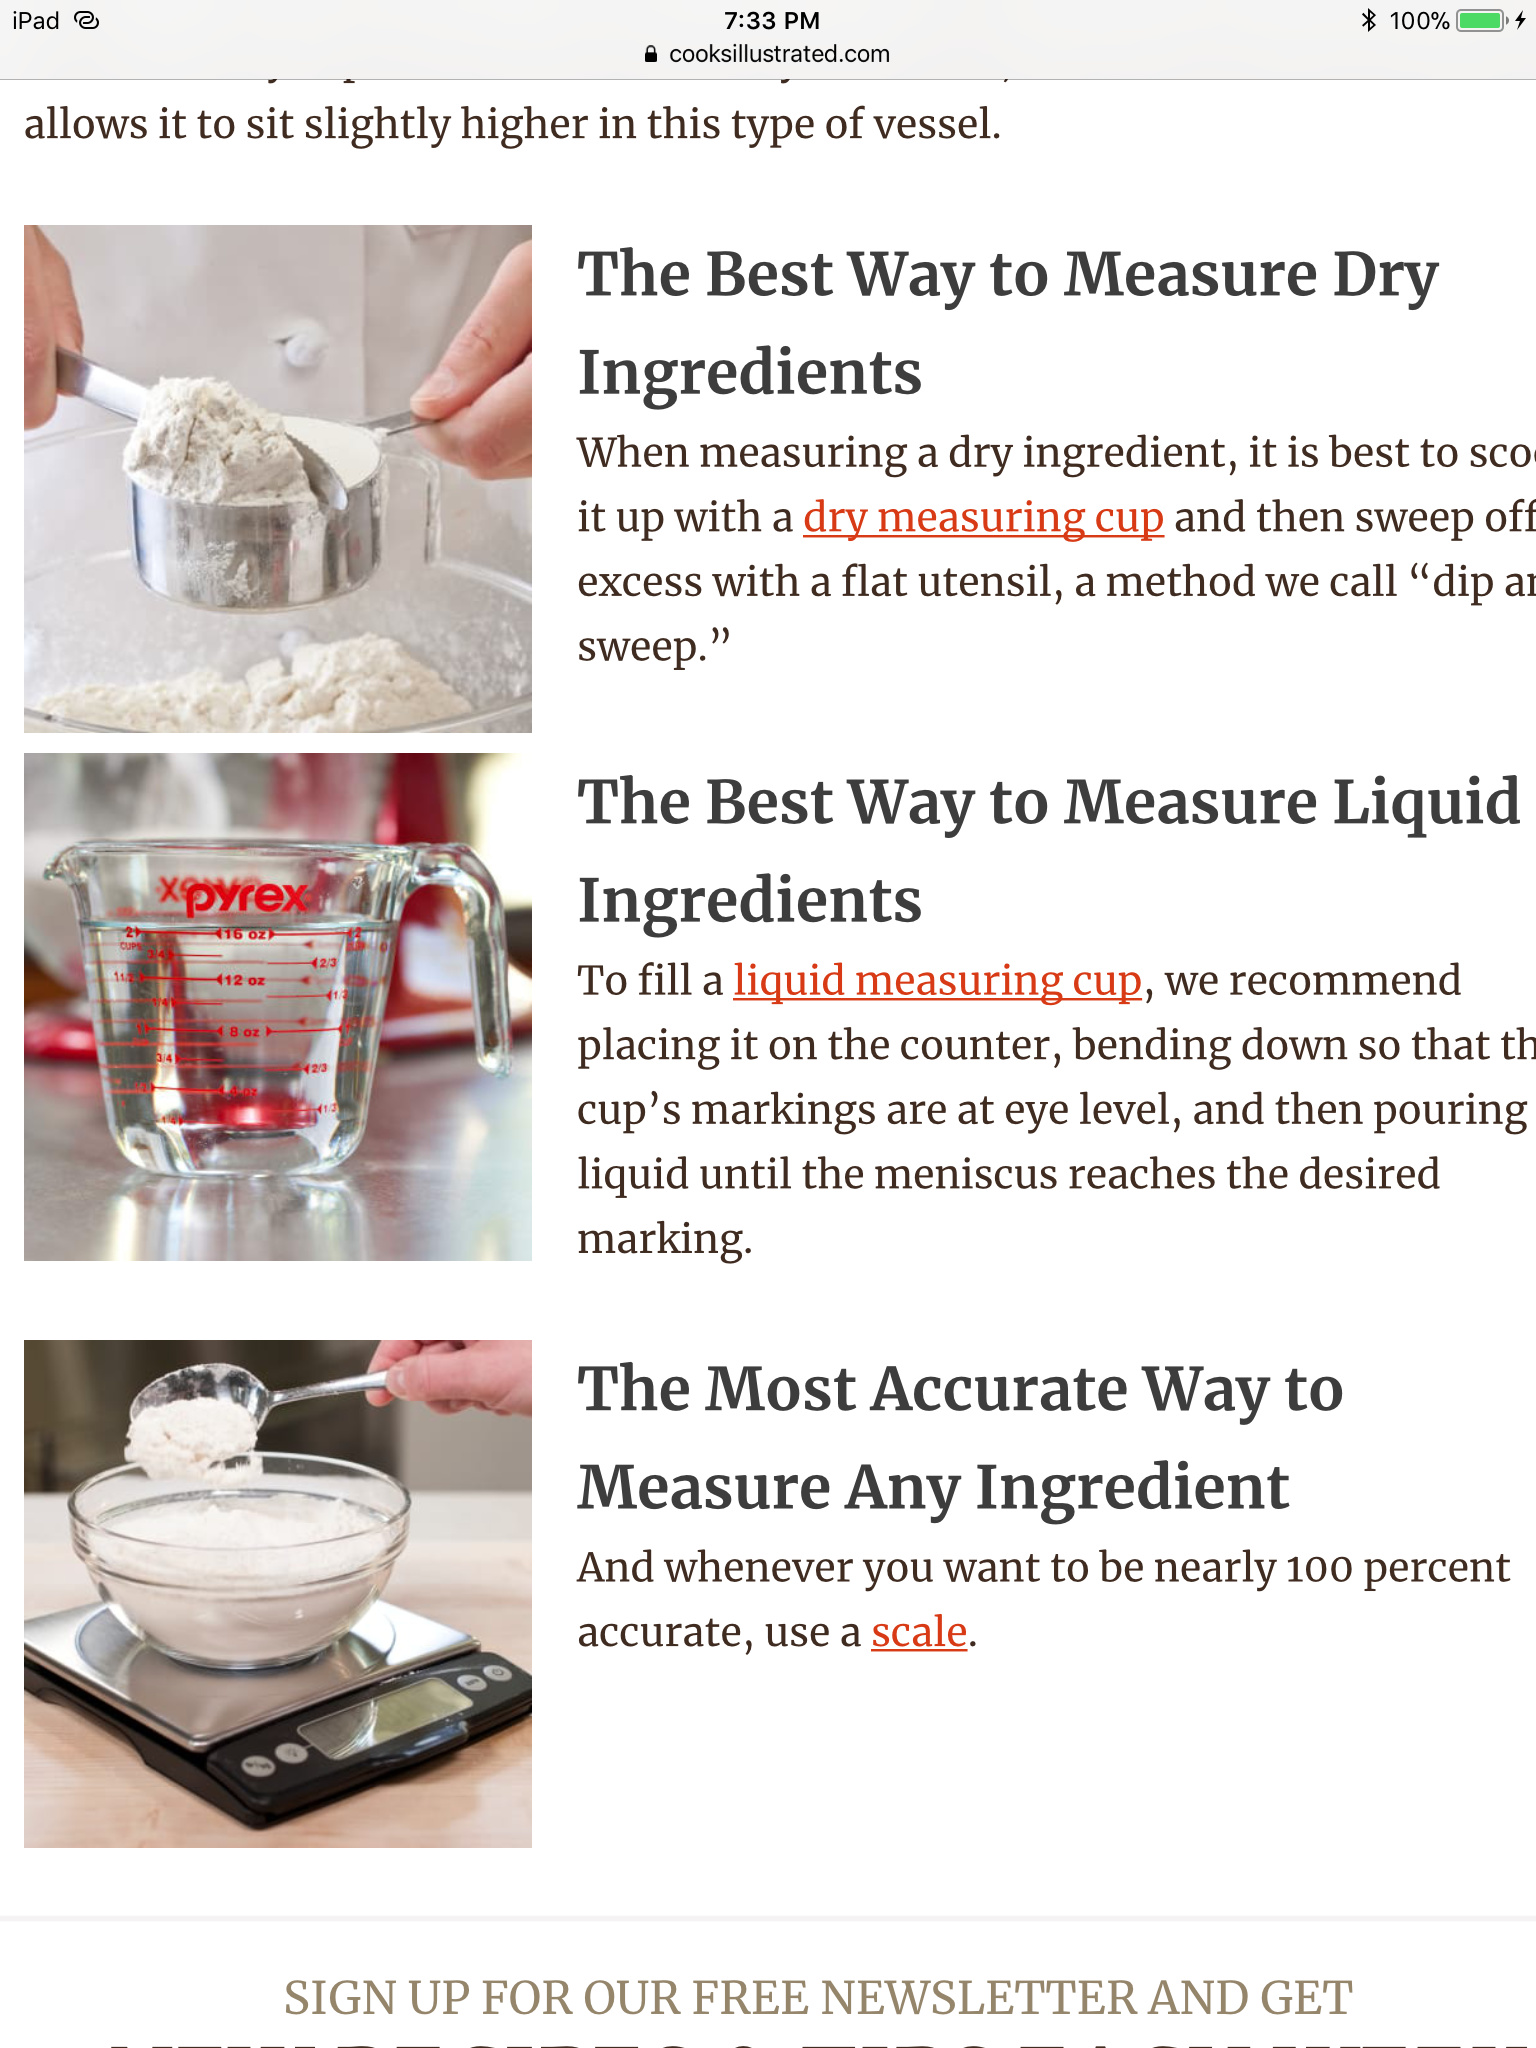
Measuring Liquids
When I’m in the kitchen mixing up the ingredients for my grandmother’s delicious chocolate cake, I add vegetable oil to the mixing bowl using a measuring cup. Measuring cups are great kitchen tools for measuring liquid ingredients, like oil. However, measuring cups don’t hold water when it comes to working in a laboratory.Scientific experiments often use liquids that need to be measured to exact amounts. For some experiments, being off by a few milliliters could alter the result. Because measurements need to be exact, a scientist needs the right tool for measuring liquid volume. The tool the scientist selects will depend on how much liquid he must measure and how precise he needs to be.
If he simply needs a ballpark figure, he might use a beaker or flask, which would be like using measuring cups in your kitchen. Beakers and flasks might have volume markings on them, but due to their shape, it’s hard to get a precise measurement using these tools.
In this lesson, we will focus on two tools you can use to accurately measure liquid volume, namely graduated cylinders and burets.
Graduated Cylinders
Graduated cylinders are aptly named because they are cylindrical containers with markings on the side, known as graduations. These graduations vary with the size of the graduated cylinder.If the cylinder is big, and can hold 500 mL of liquid, then the markings on the graduated scale would be divided into 5 mL increments. Five mL is about a teaspoon of liquid. If the cylinder is small and holds only 10 mL of liquid, then the markings would be in 0.1 mL increments, which is a tiny droplet.
Graduated cylinders are typically made of glass or plastic, which is actually significant. It’s important because we know that water and other liquids tend to cling to these materials. This attraction of liquid to the container causes the water level to be slightly higher at the edges and lower in the middle. This creates a meniscus, which is the term we use to describe the curved surface that results when a liquid is inside a container.
When you read the level of water inside the graduated cylinder, you want to measure the level at the bottom, which is the middle, of the meniscus. If you took your reading where the liquid meets the container, your reading would be too high. Speaking of ways to get an accurate reading, it’s important that you take your reading at eye level, so your measurement is not distorted by your view.
As an example, let’s say you have a glass of water, and you want to know the amount you have down to the milliliter. You can grab a 100 mL graduated cylinder and pour the water into the opening at the top of the cylinder. You can then crouch down so your eyes are at the same level of the water surface. This allows you to see the meniscus, or curve of the water level. You can now eyeball the lowest point of the meniscus and take your reading using the markings on the outside of the cylinder.
Do I thoroughly enjoy the juices I make ? No … there are some I make that just aren’t good
it happens.
I used to spend serious $$$ on juices, especially after going from my Nautilus mini to a sub-ohm setup (crown 1 + releaux 200 was my first sub ohm setup).
I too were on the fence for a long time, but now 1 year into DIY, I don’t look back and regret the choice. I’ve probably spent serious €€€ on aromas too, but they last my juice needs alot longer.
There has been some misfires, some juices never deserved a cotton pad. Some started out bad but turned godly after a long steep. In general, now its more of a hobby, and I’ve learnt to source out what juices I will enjoy based on the aromas alone. There are still juices that wont be ADV’s (all day vapes), but I still keep em and try em now and then. But more often than not, the juices I mix from all the recipes found either here on ELR, or other sources, plus my own are great additions that I don’t regret making.
I rarely buy “premium” juice now, and if I do, it’s to check if its something I can try to mimic or make a version of. Curiosity just gets the upper hand now and then.
Hope you figure out if this is for you or not.
Great reply! Except for me, I’ve never actually bought a ‘premium’ juice. I’m just too damn cheap! But everything else, my sentiments exactly.
Thank you 
Wow, you appear to be taking a calculated approach, that’s great, it will save you time and money.
You are going to want to have lots of bottle. I recommend the 50 pack of 15 and 30 ml bottle from 510 central off Amazon.
Once you get two or 3 flavors you like, you can relax and enjoy the hobby at whatever pace you are comfortable with.