Today I am reviewing the Aromamizer Rebuildable Dripping Tank Atomizer from Steam Crave. This item was not given to me nor am I endorsed by any company - this was a simple purchase and my review is merely a service to the ELR community.
I won’t bore you with how this was packaged except to say packaging is great. Nice precision cut, felt covered foam compartmented for the tank, spare glass and extras.
Upon opening the tank the first thing that struck me was how the RBA deck was not a separate piece from the base. It is all one unit. (Correction 11.12.15 - it is two pieces, but the build deck is a separate piece screwed into the actual base, but it’s not something you would notice as separate and does not come apart inadvertently when disassembling the tank, nor is it even necessary). This is a tremendous advancement over many competitor’s RTAs as it is one less part that gets wear and tear while also reducing a point between the battery/mod and the coils for any leak or electrical connection failure.
OVERVIEW
The aromamizer RDTA consists of really just 2 components:
- The build deck/base
- The tank
Build Deck
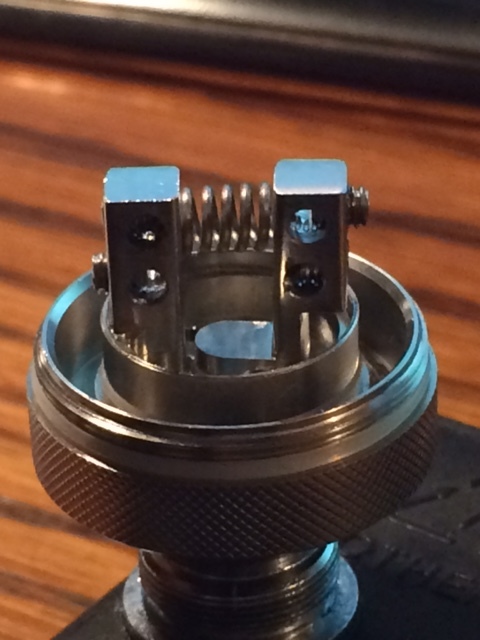
Steam Crave has provided the option for either a 2 or 3 post deck. I only ordered the 2 post (Velocity style) so I cannot comment on the 3 post. However, I would like to state that out of all the build decks I have used, whether 2,3 or 4 post designs, this is by far the easiest and most user-friendly design of them all. It also has 2 post holes per post, making it simple for horizontal or vertical builds as well as simplifying the build process by allowing the builder to tighten down the first coil in it’s place and then install the second coil without it being cumbersome or awkward as when two coil leads share a single post hole. The photo below shows the halfway point of a horizontal dual coil build. Notice how I’ve got the leads of the first coil clamped down securely and leads clipped leaving a very clean and unobstructed second side to work with. I will also add that the hex key grub screws coming in from the outside of the posts serve two excellent functions - they allow for much easier tightening without stripping as Phillips heads do, and they allow for the work to be done with the tool out a way from the build area, thereby eliminating what can be a tedious procedure. It is also what allows for a single post to have 2 post holes.
Wicking/Filling
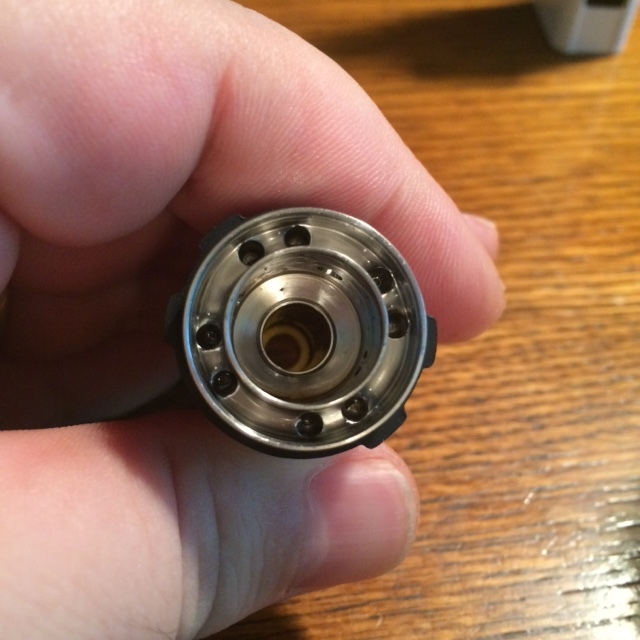
The next step after the build is simply to wick as you would any dripper, making sure to cover the holes below the coils on the deck. This is where the juice will come from. As long as you do that and your coils are within the area where the chamber sits once reassembled, that’s really it for building. Now this is a bottom fill tank. However, the most friendly of bottom fills you can imagine. Simply screw the tank off the base and hole upside down. Use a blunt tip syringe, needle tip bottle, glass dripper or garden shovel for that matter. Fill till juice starts to ooze out of the other 7 (yes, 7) fill holes. Easy peasy. Just look -
Air Flow
Unlike most other tank atomizers, the air flow with the Aromamizer does not come from channels in the base. The design here is quite unique and very efficient. The bottom half of the tank’s metal section has 4 air channels that go directly to the chamber. EDIT - I had previously stated the air channels were welded. They are not, they are milled - I had mistaken what I was seeing. Once the tank is reassembled, those channels can be aligned directly with the coils. And with the short length of these channels (approx 3/8") that means air is hitting the coils directly, just like many of the best drippers such as the Plume Veil. The other 2 air holes are exactly opposite of the two which will feed the coils, and although they don’t necessarily aid as much in delivering air to the coils, they do seem to assist in keeping the inner temperature of the chamber cooler as well as adding overall air flow. This is especially important when utilizing temperature control mods/builds. Comparing the airflow of the Aromamizer to the TFV4 from SMOK, it does not have quite as open feel to it, it is slightly more restricted. However, this is not to say it is not adequate or even good - it’s very, very good. One thing worth mentioning is air flow control. There’s no need to go into too much detail. Steam Crave provides 2 rubber rings (one 2 hole, one 4 hole) that slide over the tank and align with the air intake holes. There are no moving parts on the tank for air flow. At first I wasn’t sure how I would like this. But after using the tank I found it was easy to move the air flow ring and fine tune to the desired air flow. Unlike many AFC rings, there seems to be no point in adjusting air where that dreaded “whistle” sound appears. I found I like the air flow wide open, and I could have just left the ring off. But I like keeping it on there just in case I do want to adjust it. And it also provides a little protection from bumps or drops.
Aesthetics
This is simply a good looking tank. I have the 6ml version. The 3ml version looks the same just shorter.
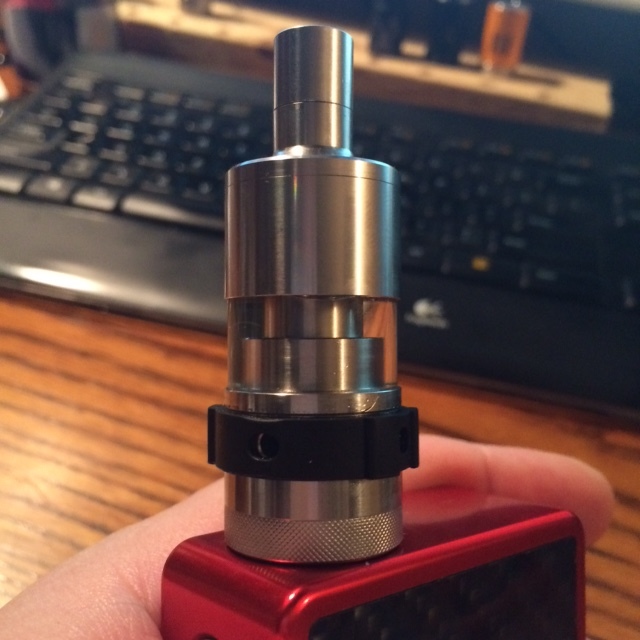
There is, however, one thing about this tank’s design that may be a bit off-putting for some. The top of the tank has a conical design and the drip tip connector protrudes from it as seen below. This effectively eliminates a lot of drip tip options as aesthetically, some will just look funky.

Some will look ok though.

However, the drip tip included is also quite unique. the 510 connector is designed much like many atomizer pins in that it has air flow from the sides but rather than the bottom being for making contact, it is for preventing spit back off the coils from reaching the user’s mouth. It is very effective as I used it on another tank that spits at me all the time…it eliminated that completely. But…it’s all metal, so it gets rather hot and for a chain vaper this means either bearing with the heat, turning down the temp, or taking time off from vaping while it cools back down. That being said, I have used my metal and glass tip with zero spit back, so it’s a cool feature but not altogether necessary on this tank.

Vapor and Flavor Production
Honestly, in both of these categories I see virtually no difference between the Aromamizer and an RDA. The similarities are uncanny. However, if I were to say there is a difference it would have to be with flavor. There is a slight but noticeable difference in flavor intensity. I built a temperature control build for this tank and went all up and down the spectrum of power and temperature and could not match the flavor intensity of the comparison object, the Plume Veil. The builds are identical, yet the Plume Veil RDA wins the flavor contest. This is not to say the Aromamizer is not a good flavor producing tank, it is. Very good. But if there is an area that seems to lack when comparing to a dripper, flavor would be it.
PROS
Big, 6ml juice capacity
“Velocity Style” 2 post build deck option
Easy to build and wick
Essentially leak proof
Excellent flavor and vapor production
Cons
All metal drip tip
Conical shaped tank top with protruding drip tip connector. Makes it look weird with many drip tips.
Personal Observations
Let me close this review by saying I love the Aromamizer. If Steam Crave had made the top of the tank flat with a recessed drip tip connector I would be calling it absolute perfection; because this would mean I could put any ol’ drip tip on it and it would look awesome. But is that a reason not to own one? Absolutely not! I will pick up at least 1 or 2 more of these. Price point for what you get is reasonable too at approx $45. This may go down some over the coming weeks, but as good as this tank is I’m thinking maybe not. And with it being so easy to fill, so unlikely to leak, and so satisfyingly similar to dripping, I think this tank may well take flight and soar high in the clouds, looking down on it’s competition. Way to go with this one Steam Crave!


 Oh well, works for me for now!