I do actually have one… question… what is the extra ring for with the plastic screw?

2 Likes
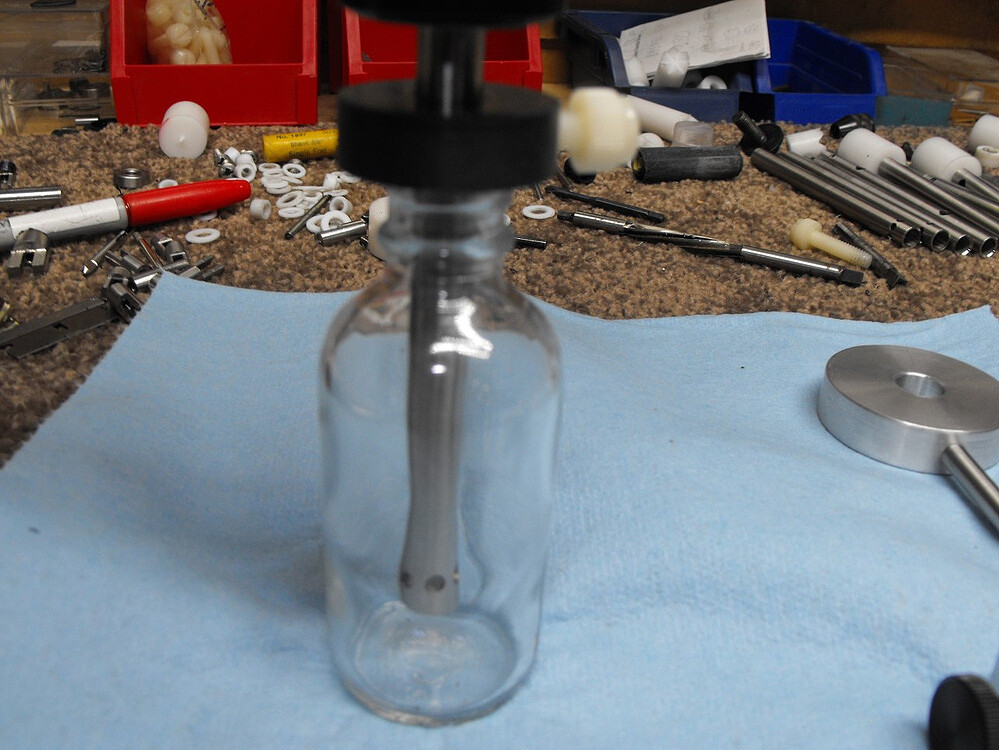
Its used as a depth stop. Set it where the tube is 1/2 to 2/3 down in the bottle. It makes it easier to just rest on the bottle opening.
2 Likes
Hi kndabutch ![]() I got mine just about a week ago and and it’s already changing my mixing world. I’m sure you’re going to love it.
I got mine just about a week ago and and it’s already changing my mixing world. I’m sure you’re going to love it.
3 Likes
ahhh… makes sense. ok thank you
3 Likes
There’s only one problem with having so many recipes available this fast…now I have to either clean out or set up more attys![]() . The madness never ends (and that’s fine with me
. The madness never ends (and that’s fine with me![]() )
)
5 Likes
Step 1) Don’t listen to me, I’m some dummy on the Internet. I do not represent Game Changer …but I do own and operate one. I came on ELR because last mix session I had a problem and was hoping to get some repair/advice, but I can’t find any new convos re: the Game Changer. Any Updates?
My problem. I was mid-mix (homogenizer on) and there was a sudden speed change (audible). After analysis/disassembly it appeared I had a bearing issue (did not turn easily with my finger). The small bearing is visible right on top of the shaft assembly. Me? I’m somewhat of a micro machinist and sell tools and electronics online. They don’t work usually when I buy them but they’re like new when I sell them. I can fix anything.
After poking around here it didn’t sound like the GC guy was available, but his post above gives you everything you need to FULLY disassemble/clean and properly maintain your Game Changer. Best is what NOT TO DO (remove grub screw). That’s actually the most important stuff to follow. Haha like NOT following my advice ![]()
OK here’s my advice and how I fixed my aging Game Changer. My problem was I was being lazy in cleaning, but also the bearing was struggling lubrication-wise. I remember back when a ball bearing made in the US and they were always PACKED with grease. This small bearing spins at a relatively high RPM (5.000-ish RPM at half Dremel speed). Having tried it for a second or two at higher RPMs on my Dremel dial I saw ZERO increase in “homogenization” and instructions warn against high speed use ever.
I had never fully disassembled as described above and it was “unclean” inside the shaft/rotor when I did (just now). Water getting/laying all up inside while stored is easily blamed …oh well I’m to blame …never more! Talking about bearings from China …they’re famous for having minimal lubrication. I have found myself repacking almost every bearing I’ve worked on for the last 30 years for this reason. It’s actually easy but requires you break some rules …and you MUST have the proper grade high-speed grease. Me? I collect that stuff from Grampa’s Garage sale(s). I have every lube/grease/oil/solvent/glue …because I use 'em! Heh I had some Carbon Tetrachloride from some old guy’s garage that was like 50 years old. Can’t even sell that stuff …came in handy tho ![]()
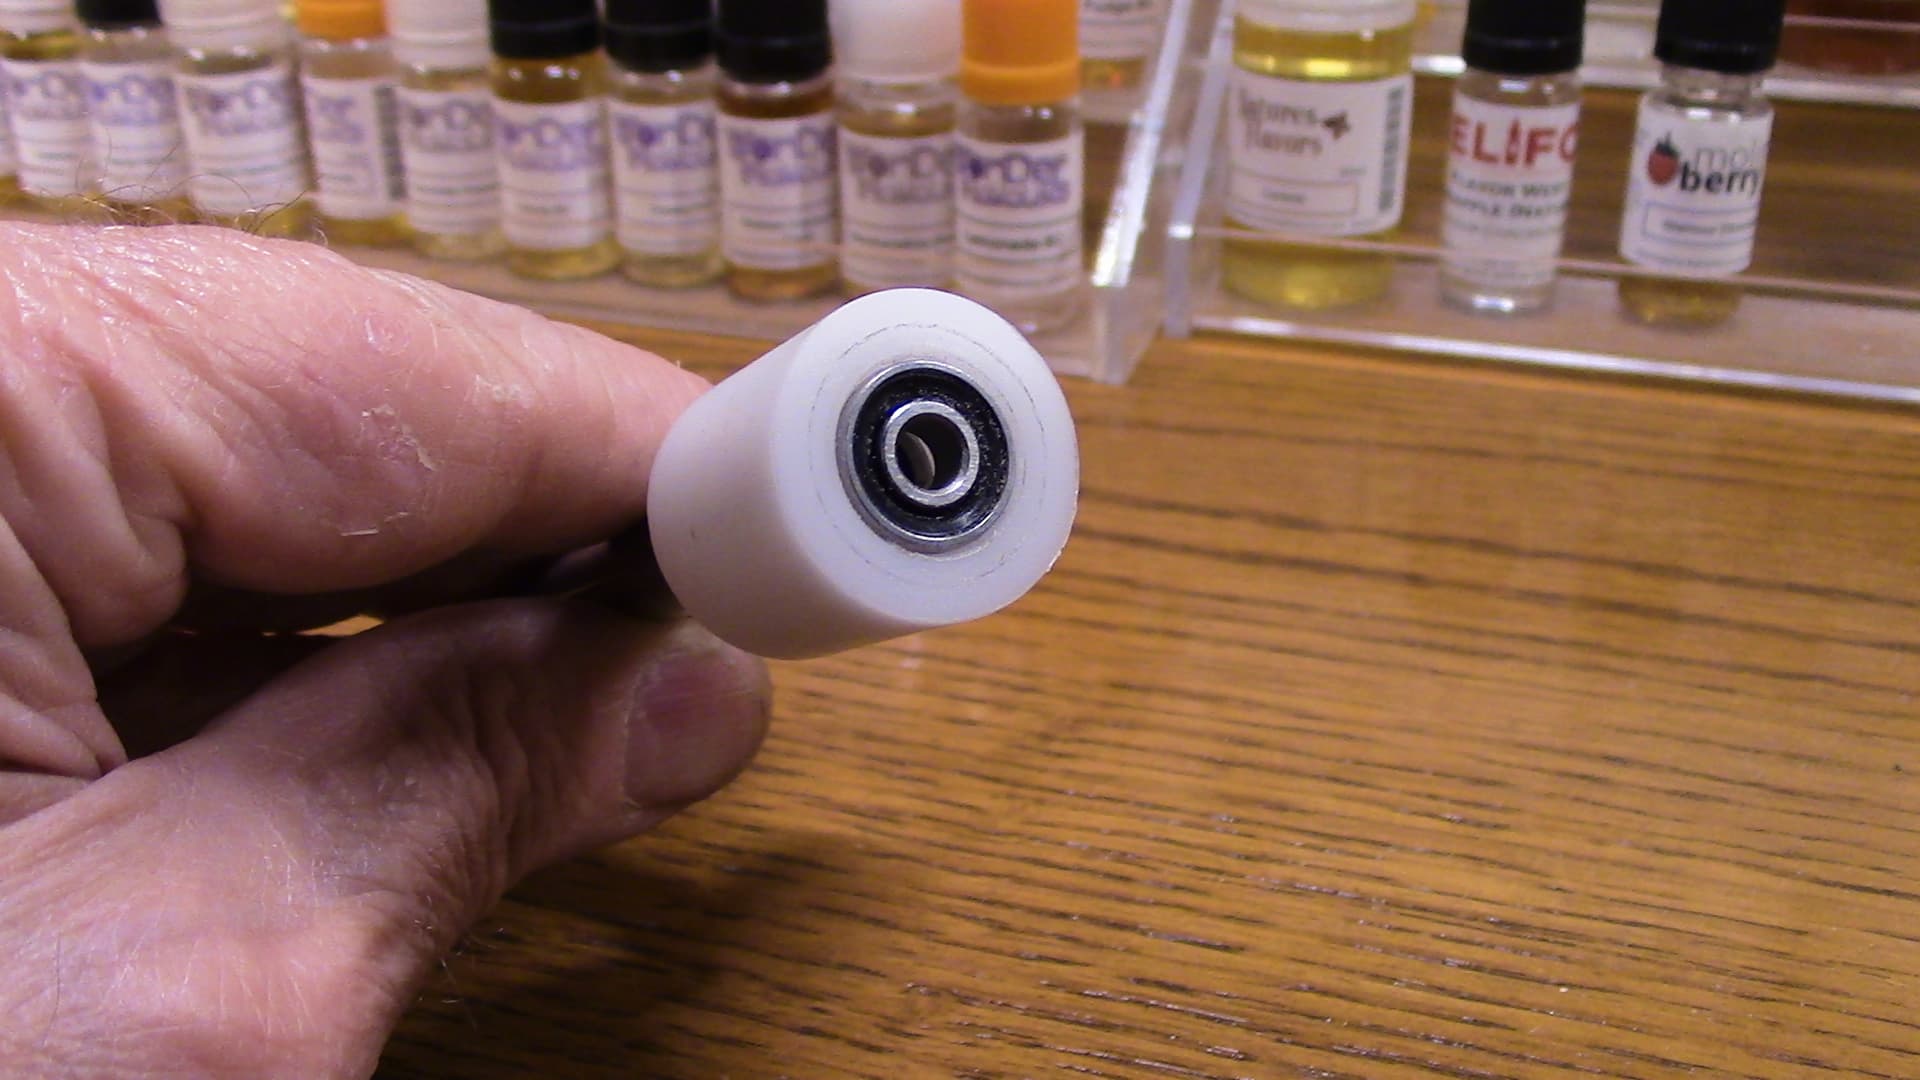
Ok here’s what I did that you shouldn’t. Do at your own risk. While fully disassembled as pictured above you can see the bearing at the opposite end of the shaft from the homogenizing end. Remove the metal rod to have clear access. The bearing is clearly metal but mine had a dark blue seal of rubberized metal between the two rings of shiny metal …the bearing races. You need to lift out that seal to access the actual balls of the bearing, oh look grease. Bend or damage that seal and you’re toast. It’s a very thin washer specially coated with rubber so it seals out water and seals in grease, and it’s very small when removed. So how to do?
Metal to metal load bearing surfaces create incredible friction and your enemy is DIRT of any kind. Even lint. Anything but fresh grease is simply contamination and doom. Wash your hands before you start and have a clean work area. Wipe off the exterior end with the bearing with a lint-free cloth. I gently ran a toothpick around the outside of the seal too because there was substantial junk …likely the source of my problem …never having fully disassembled for cleaning.
The seal comes out easily! The trick is not damaging it. No knives/pliers/screwdriver etc. I use a corkboard pushpin! Nice little handle thingy for control and all you need is a small point to get just between the outside metal race and the outer ring of the seal and pry a tinniest bit and it should lift slightly. Unlike a knife, a needle or pin gets between the metal and rubber and doesn’t have a sharp edge that might cut that outer rubber edge of the seal. Dont poke the rubber, get between the metal and rubber of the seal. Hey? you gotta put that thing back in there!
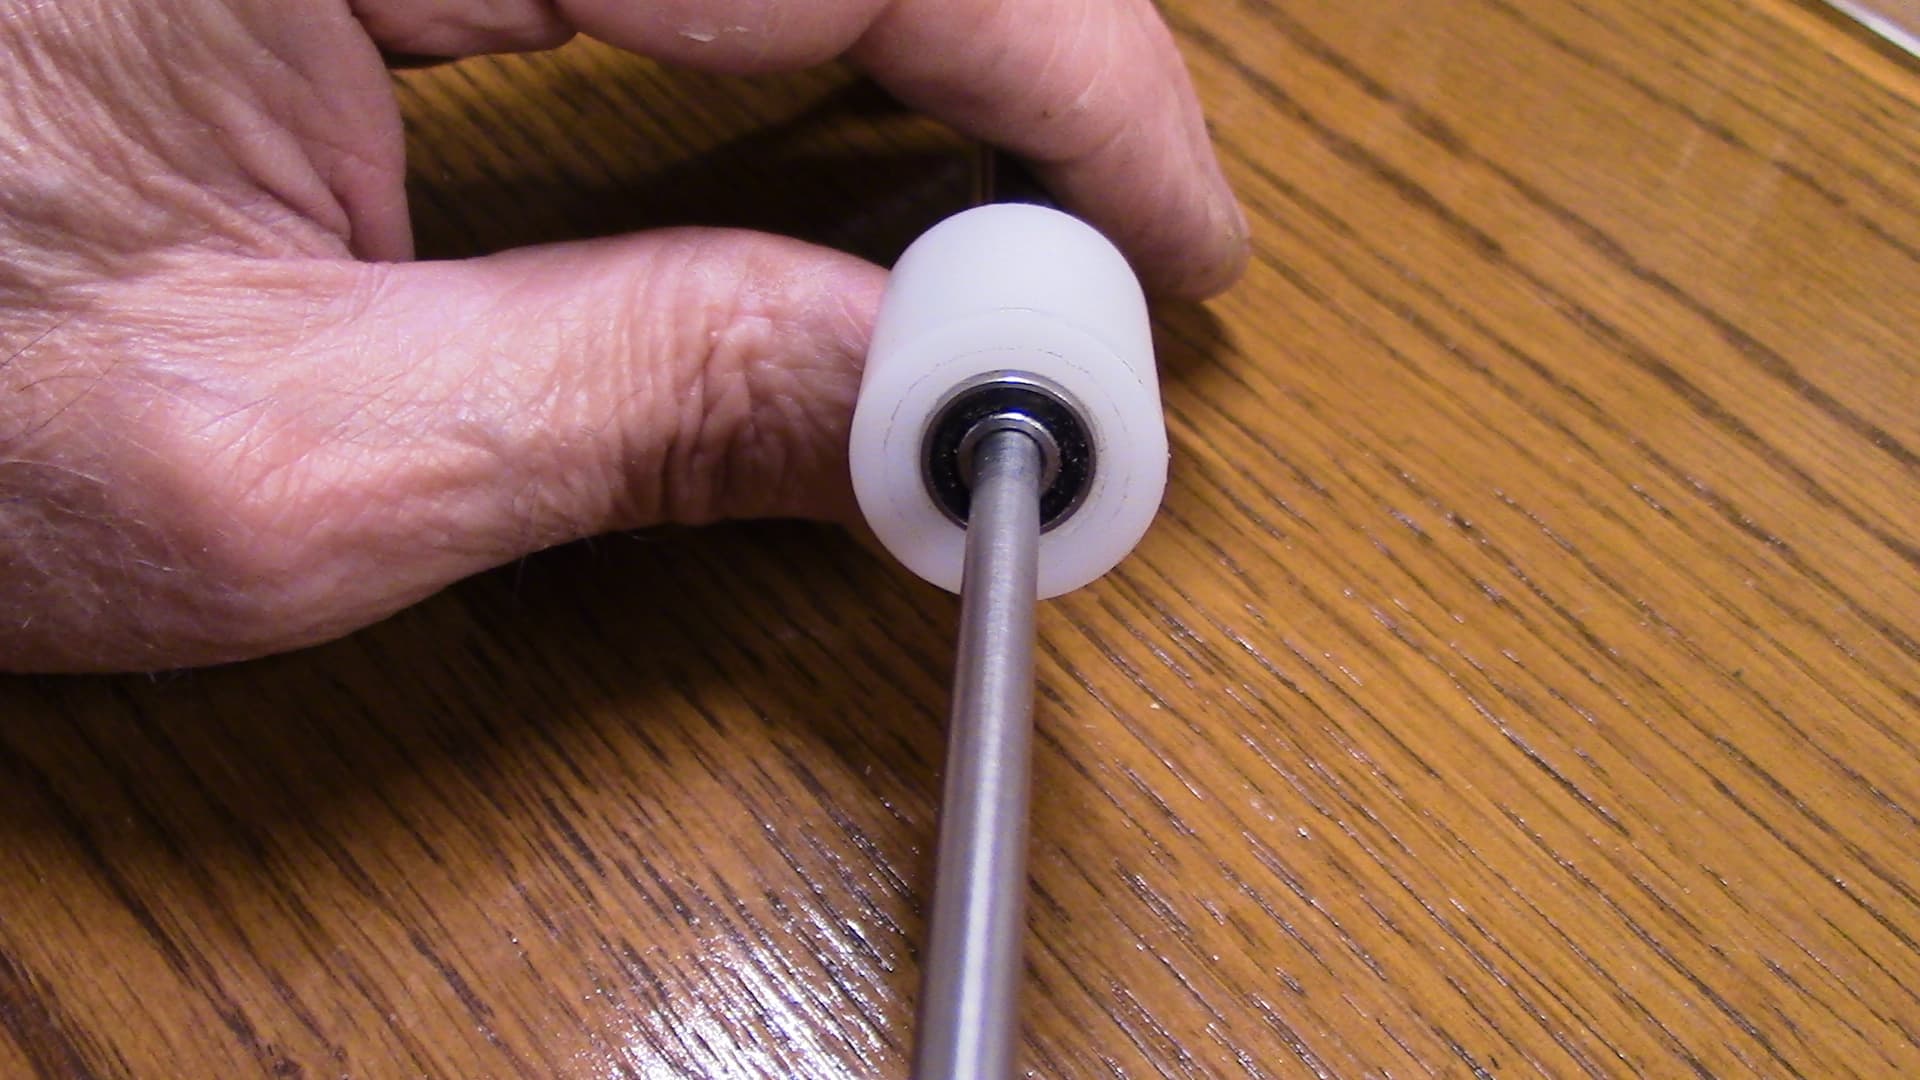
First thing I noticed was a lack of lube and all the visible grease was hardened and black. Very carefully I removed the grease from the underside of the seal with a lint-free cloth. Then with a clean corner of my cloth I wiped and that top surface of the bearing assembly (balls under a ring). Be careful not to get any fibers inside. No need to get super clean! No solvents! You don’t have access to the other side of that bearing and seal. Add your machine-grade lube, but do NOT overload, leave space between that new grease and the seal you are about to replace.
Too much thick grease can cause enough pressure against the seal and make it pop off in operation. I only added what might have equaled two matchheads and worked it in by spinning the inner bearing ring using the central shaft laying near. Moderation is critical here. My bearing was looking very dry and toasty at first but now it spun smoothly and freely. The seal pops right back in place with ease. Make sure the rubberized side is visible facing out, not that inner track ring of visible metal which should now be holding in the grease inside, and see? Not cutting that edge with something sharp when removing the seal also keeps the water out and keeps it in place securely.
So? At first I was sure my bearing was blown (chipped balls) but it was just dry and dirty. It took me longer to write this than it took to actually fix. Hey? If you have an Apple watch and read all the way down here? Put yourself down for 1.200 “steps”. I hope this helps anyone who had a similar problem and I will likely do annually to keep getting the most outta my GC for years. More importantly keeping all the inner and outer spinning parts squeaky clean is very smart.
What not to do? Don’t overthink it. Go slow. Safety First. Never do something you can’t undo. Remember you can’t get to the other side of that bearing/seal. No need to get squeaky clean, that always goes badly (try and remove all the dirty grease, uh no). More is not always better, especially when it come to grease! No Q-tips etc …new grease must be 100% uncontaminated …no little fibers.
Boss man if you’re still around and don’t want this here, feel free to have an Admin move or whatever. I posted this here as it seems relevant and is the last Game Changer post I found. Man! I panicked when I thought I was outta the Changed Game~! Thanks guys! Now I gotta go MIX! YES~!
8 Likes
Hi Bo. GC aka anon36682625 here. If you or anyone else have questions or problems concerning the GC please PM me. I have grave concerns about the bearing problem. 2 others have experienced failures. I will stand behind anything I make and have replacement bearings. I also have bearing from a different mfg.
While I admire your self sufficiency, the lubricant within the sealed housing is a non toxic food grade substance…thus the blue rubber seal and why I chose them. Blue is a FDA/USDA designation as safe for food contact upon failure. Specs declare these good for 50 K rpm but as I said there have been other failures. I have 2 others (double sealed stainless) which may be a better choice. 3 known failures over more than 100 units gives me pause. If they last a year…dunno.
I experienced a severe event health wise and spent many months pretty much unable to function. I am doing fine now. Before I can consider producing anything else, I need to resolve the upper bearing issue. Rob has my personal email. Dan
9 Likes
Hey GC, I’m glad you’re doing better, it’s good to here.
Out of curiosity about the ones that failed, did they seize up?
4 Likes
Hey, it’s been awhile. I hope you’re doing good.
On the bearings “seizing”, no. With one there was a lot of heat buildup which caused damage to the Delrin housing. The second was noise and hard to turn, but not seized. The operator will notice long before seizing. Like Bo, a drop in rpm and maybe noise.
I changed to the “FDA Blue” after I started shipping overseas. Customs in one (ME) country seized a device and gave me a lot of trouble. I proved that everything was up to safety standards but it cost me time, money, and aggravation.
So reading Bo’s description I think the internal lube probably “cooked” and became stiff. Putting regular grease sounds to me like there was no wear since he is still using it. Regardless the bearings are not difficult to replace. They are press fit and will just pop out. I’ll take some pics tomorrow and will be glad to send replacements to anyone that needs one. Or, it can be returned and I will do whatever is necessary. I’ve been buying and repairing other homogenizers for quite some time now. Bearings is where I start. Oddly enough, I was using the same bearing Pro Scientific uses before I changed to the blue seal. I think I’ll go back to that though there is another alternative. Ceramic, but they’re ungodly expensive.
Sorry for being incommunicado but it definitely wasn’t by choice. ![]() Got a bad case of old man.
Got a bad case of old man.
9 Likes
Hi glad your feeling better ,just a thought if you post the specs of the bearings you recommend then if a problem arises we should be able to get them ourselves.seems a lot of hassle for no fault of yours,mines still working fine and has been since I got it
7 Likes
Great to hear from you again Mr. Pipes. Glad to hear you’re on the mend. Take care of yourself, brother.
6 Likes
Thanks a lot. I use mine once a month when I make 1.5 L and it’s working fine. Good luck.
4 Likes
Thanks for the well wishes and glad to hear most GC’s are working fine. If not please let me know.
Its a long story but I was able to reinstate my email gamechanger1952@yahoo.com. It was “dead” for quite awhile. I was both pleased and embarrassed to find numerous inquiries about the homogenizers. Interested parties are welcome to contact me there and you will get a response. However, I am unable to ship overseas. I will post pics about changing bearings shortly.
8 Likes
You’re correct and as old as I am you never know. ![]()
These are common sizes though stainless sometimes has to be ordered.
The small GC uses a SSR3-2RS =3/16 x 1/2 x .1960 OR SSR3 ZZ which designates a stainless seal. I recommend using the ZZ which has held up much better.
The larger uses SSR4 (2 RS or ZZ) 1/4 x 5/8 x .1960.
Its ultra simple to change the upper bearing. Unscrew the rotor from the drive shaft as pictured above for cleaning. Find something either 3/16 or 1/4 depending on which size GC you have.
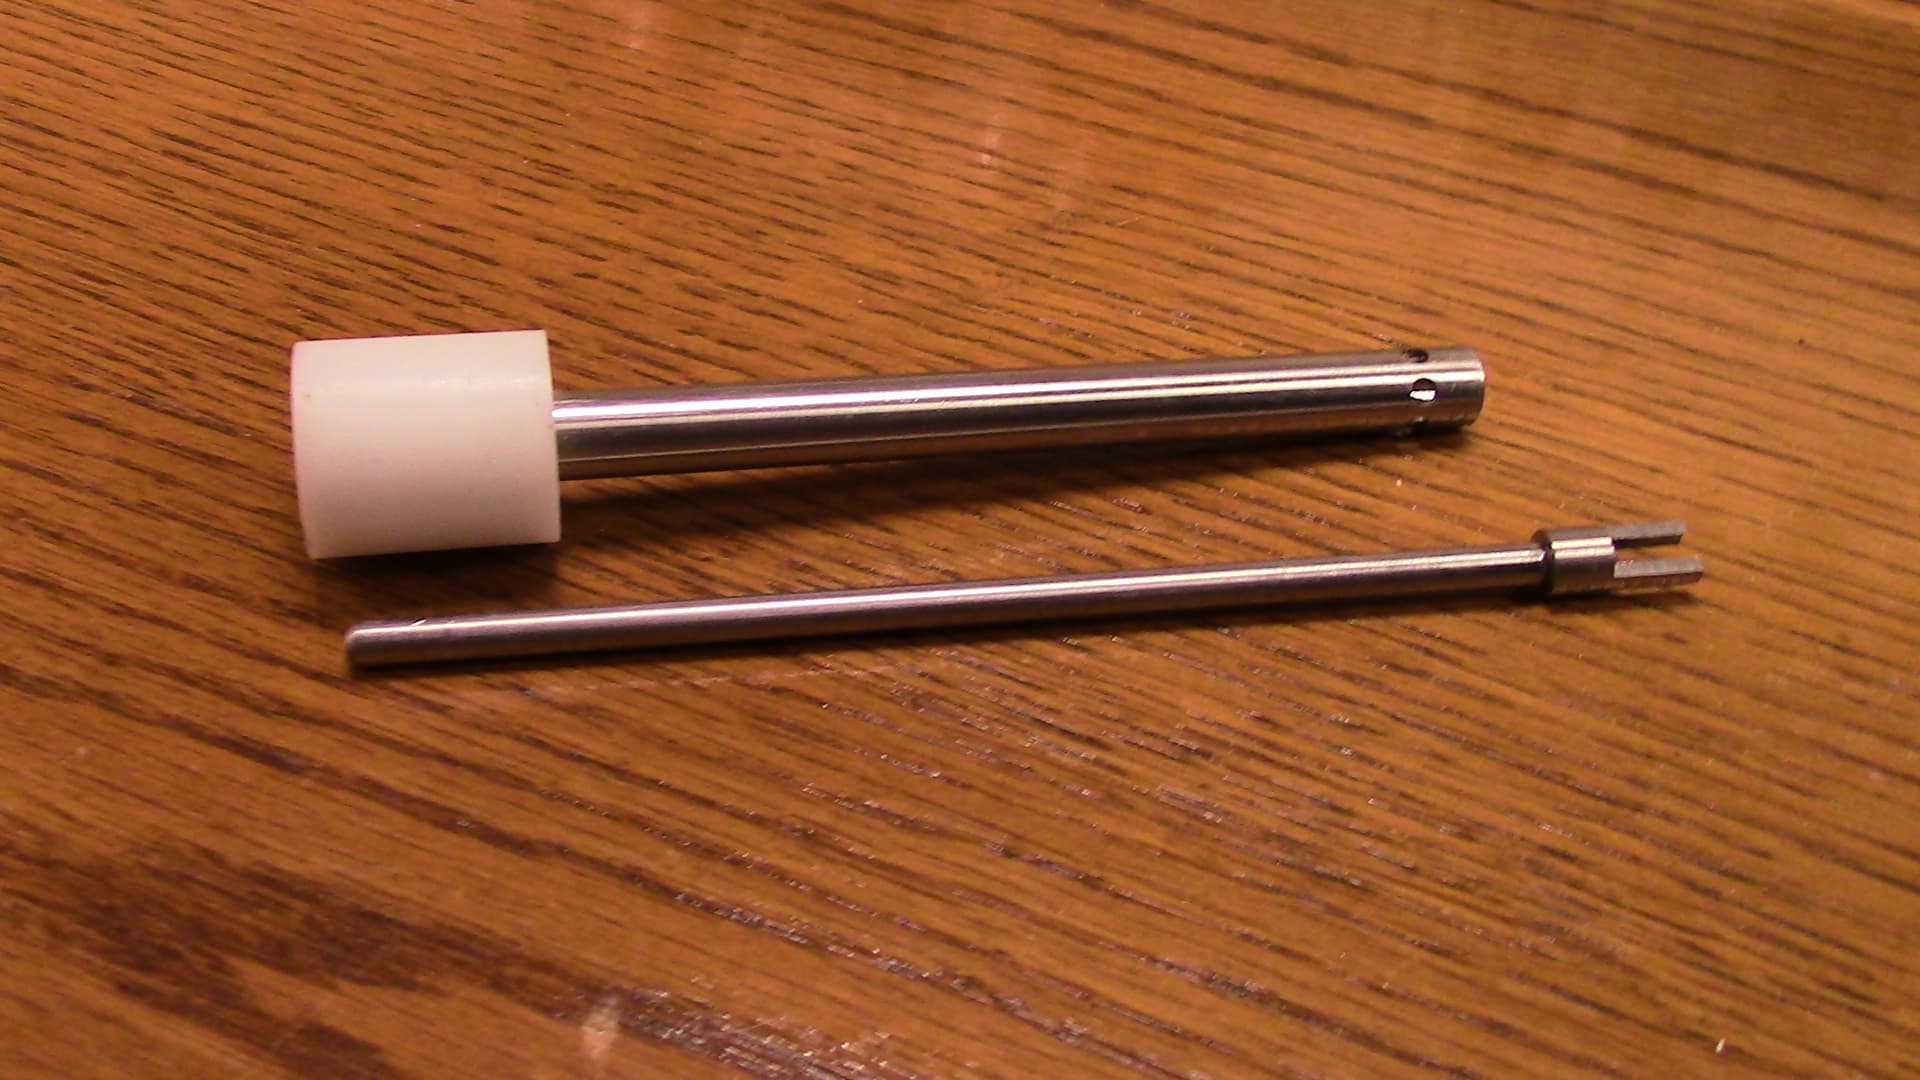
The bearing is in the white Delrin housing…It is a press fit.
Insert the rod etc into the bearing and pry/ wiggle gently until the bearing pops out.

Press the new bearing in by pushing it against a flat surface. DONE ![]()
10 Likes
Thanks for that I will order a new one or two as I’m in the Uk and might as well be on the moon getting harder to get even simple items.As I said mines been fine but your better to cover your bases,hope you stay well
4 Likes
It’s good to see how easily this can be removed. I have broken a long list of stuff in my “curiosity” over the years, and that drove my caution. That’s how we learn. I should have taken a picture of the top side of the bearing I worked on, just for the records. Now I worry the back-side seal may have failed …and now I see I can pop out and check. A popped backside seal could be allowing liquid to get to that petroleum grease …bad. Me feeex!
I also worried about using that machine-grade (not food grade) lube, so I’ll contact you in IM re: a replacement. Cause of failure may easily be blamed on moisture laying up in the shaft. Your disassembly instructions may be critical care and not just “oh yeah this come apart”. I am going to be doing it after every mix session …it’s only a couple minutes extra anyway, and guarantees lab-grade cleanliness …like fussing over your glassware etc.
I have a clear silicone food-grade lube (grease) I bought in the plumbing Dept at the BigBox hardware. Danco Silicone Grease for replacing those Moen lever valves in sink assemblies, so supposedly water resilient (NOT their “waterproof plumbing lube”) and ok if a bit gets in your tap drinking water (FDA 21 rated). It is very thick and clear (fully like other greases) was just more unsure if it was rated for hi-rpm ball bearings. Eyes say “yes” but brain says “you don’t know shit” ![]() Still sounds like a viable test with a freshly degreased original “blue seal” bearing. That’s how I roll. I’ll get pix this time.
Still sounds like a viable test with a freshly degreased original “blue seal” bearing. That’s how I roll. I’ll get pix this time.
We all know vaping petroleum products, even small amounts, is bad. I now plan to pull my bearing fully, and take a new look and remove all (petroleum!) grease and inspect the seal on the side actually exposed to Juice while mixing. These bearings are the major component of the GC and we do need to keep everything food-grade. Also glad to hear I was only one of a couple having problems. Heh! Luckily as a Member of the Church of the Little Blue Screwdriver, I’m overly aware of any changes during operations ![]() and caught it immediately. Is there a Spec rating on the exact grease recommended?
and caught it immediately. Is there a Spec rating on the exact grease recommended?
Thanks SO much for getting back to us and we’re all SO happy to hear of your recovery. Rest Up! No worries…
7 Likes
I’ve had a lot of feedback after being out of the loop for the most part over a year. On the subject of maintenance and warranty I would like people to know the following:
-
I warrant against any defects in materials and workmanship. I didn’t specify any time period and don’t intend to. Unfortunately some things will need to be sent to me but as above the bearing change is easy. I expect them to last several years but 3 haven’t. I’m sourcing others and working on an alternative which I learned from what a major manufacturer is using. I’m testing it myself before making changes although they are the leader in the industry for lab sized devices.
-
I’m not a manufacturer. Just as I said from the beginning a few years ago, just a retired old man and vaper piddling around in my shop who wanted to bring the benefits of mechanized mixing i.e. homogenization to the DIY and cottage industries. If I engaged in manufacturing the prices would easily quadruple or more.
-
On the subject of cleaning and disassembly, the lower Teflon bushing should never be removed except by me. They are Teflon and nothing we use will stick to or contaminate it. It should last for many years. I started servicing and repairing several different brands and found many that were in still in good condition after years of service.
The materials used for constructing these vary plus or minus a couple of thousandths which is a lot for the application. Tooling used varies the same. They wear. So I need to fit these and can’t just ship them off the shelf. A few thousandths off can be problematic. Pushing them out through the lower end will cause them to shear in the lower exit ports because those are left sharp for the “high shear” effect. Just unscrew the rotor from the driveshaft and remove the drive shaft and rotor and then hold the device under running water. As said above though, I seldom do more than run the device in a glass of distilled water and shake out whatever droplets remain. It depends on what I’m mixing. I have devices made by others where it would be a major ordeal to clean other than by this method.
I’m planning to list some very nice equipment in the for sale section and yes, I’m back in the saddle as far as producing GC’s on a very limited basis.
9 Likes
I bet you 90% of the ones that failed at least maybe more are from lack of cleaning. Two words COMPRESSED AIR, well after washing. I use my compressor airline to dry just about anything and everything really gets in the nooks and crannies corners
I’ve been watching from afar , I’m still pretty new here… Read a couple year posts nifty little gadge… I may have to check that out… Thanks!
3 Likes
Exactly, Teflon is tough . I work in the auto repair biz and that’s what Ford uses for their power steering racks as washers for the (really) high pressure lines.
, Once you remove them there junk if you don’t know how to…well in my experience anyway.
it’s funny cuz to get them on we just had to soak them in hot water
If you get this maybe you can reply a link to where I can check this out seems pretty great I was on at the other day but I forget where it was. Thank you
2 Likes
Interesting. @BoDarc told me that he thinks mineral buildup from his water caused the bearing seal to fail. Possible I guess and he did say that he had been lax with cleaning it. My thoughts are that the usual crappy Chinese “quality” control is at play. But, I’ve had these last over 2 years and are still fine.
I use distilled water for drinking and cooking and use it with my mixing equipment. Distilled is otherwise called the universal solvent so I haven’t seen any buildup like that. For those using it for thinning a mix I would use distilled. Pure H2O and nothing else in it.
With the GC’s there is an upper ball bearing at the top and a lower guide bushing at the bottom made from PTFE or “Teflon.” Technically it is a plain bearing but guide bushing is what people here are familiar with. Removing the drive shaft and rotor for cleaning is easy and then the stator tube can be held under running water. The guide is a drive fit and placed about 1 inch inside the tube. Due to tight tolerances I then locate and machine dead center. Most materials used are + or - .002 so while its a pain to do I’ve found this to be the best way.
I’ve been posting about the homogenizing process on the forums for several years so It would be hard to direct you a to a particular post. I’m glad to answer any questions as to the how and why concerning high shear homogenization. However https://www.silverson.com/ has some really great short video’s I recommend to everyone. I can answer exactly what is taking place with the mixing products we use. ![]()
3 Likes