I'm late to the party, Vaporesso Swag 2 kit Review

Vaporesso Swag 2 Kit Review

Firstly I’d like to say that I hope all of you are doing well. Stay safe and we’ll all get this troubling time together. Okay, I’ll be going over the Vaporesso Swag 2 Kit today. This product was sent to me directly from Vaporesso for the purpose of this review. It will not effect my opinion in any way.

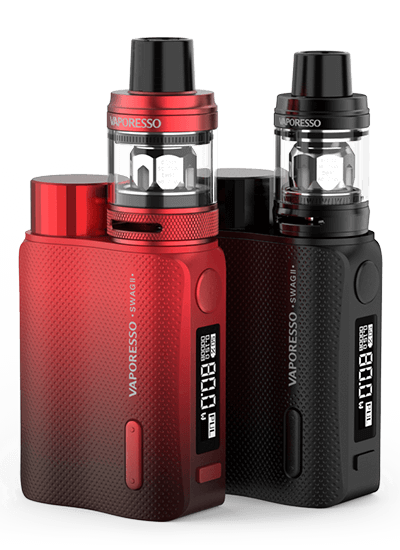
Vaporesso has been around a long time. They’ve made countless quality products over the years and this is one of them. What you get in this kit is an elegant Pico styled mod with a nice tank and a few extras. I got the Red/Black version and it’s quite striking. Holding and looking at it, it makes me think of the word “Classy”.

I’ll go over my experiences with everything and point out some of the specifics. I have no way of testing for accuracy or anything too technical. This review will mainly be my opinions and facts I’ve learned about this kit. Firstly I’ll list what you’ll get in this kit.

In the box-

• 1 x SWAG II MOD

• 1 x NRG PE TANK (3.5ml)

• 1 x GT4 MESHED Coil(Pre-installed)

• 1 x GT CCELL Coil

• 4 x O-ring

• 1 x USB Cable

• 1 x User Manual

• 1 x Warranty Card

Build quality and Design-

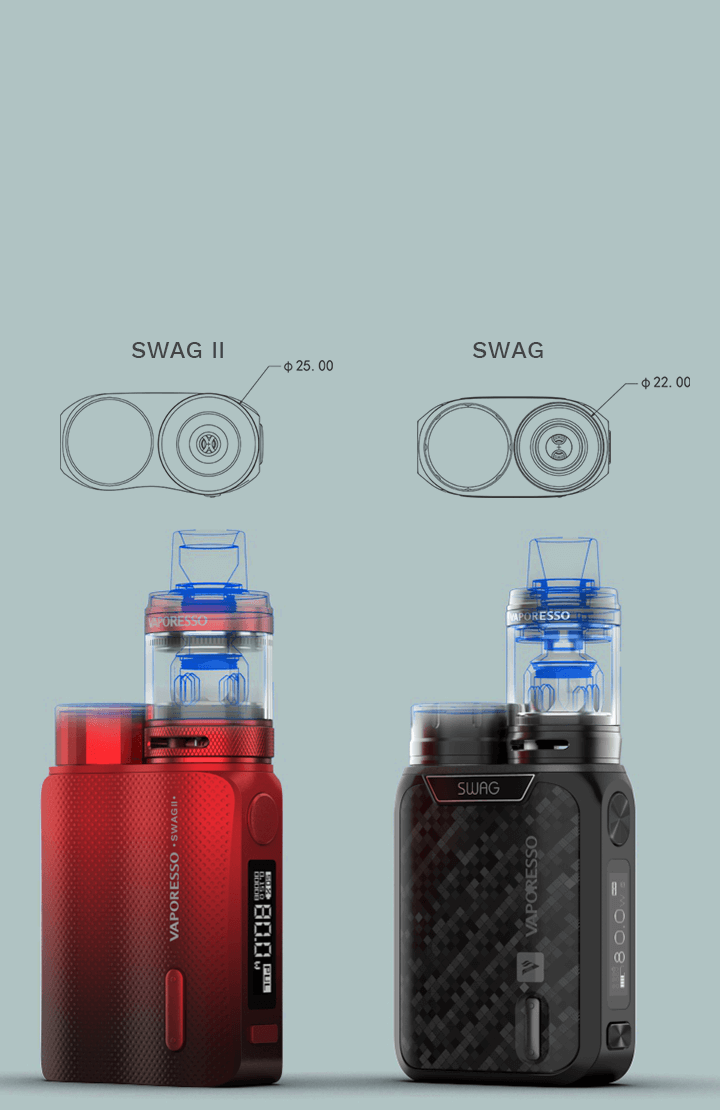
The Swag 2 is like the first Swag in ways but has been updated in a lot of areas. It’s very small and lightweight. They implemented a flask-like shape to accommodate wider atomizers. The first Swag could only handle up to 22 (or 23?) MM atomizers because of the battery cap. This kit comes with a 25mm tank. Here’s an illustration that shows the shape comparison.. I also took an actual photo of my original Swag vs the Swag 2 from a top view.

Both have battery caps and switching out cells is easy. The caps are also interchangeable with one another.

The enire mod (and battery cap) feels like it’s been coated with rubberized paint. It feels really good in the hand. Right handed or left handed, it feels really nice either way. The mod is black on the bottom but tapers nicely into a dark red color. It looks like Vaporesso added 3 new colors to the Swag 2 lineup.

The Swag 2 Mod-

The chip has been updated to Vaporesso’s popular Axon chip (also used in the GEN). The screen has a nice simple display highlighting the most important features. It’s also equipped with a puff counter (00001). There’s a menu button below the screen, and the up and down bottons are located on the side. You also have the ability to lock all settings. It’s five clicks on and off. To access the menu, click the menu button three times or just press and hold it. There’s several modes which I’ll list here-

Pulse Mode- This is the default mode that works like regular wattage mode. It does this mode really well and fires almost instantaneously. It supposedly pulses every millisecond to give you a better experience.

Power Eco Mode- This mode is supposed to help when the battery is getting low. When your cell drops below 40% the mod will prompt. It asks if you’d like to switch to Power Eco Mode. So yeah it’s basicly “Battery saver” mode.

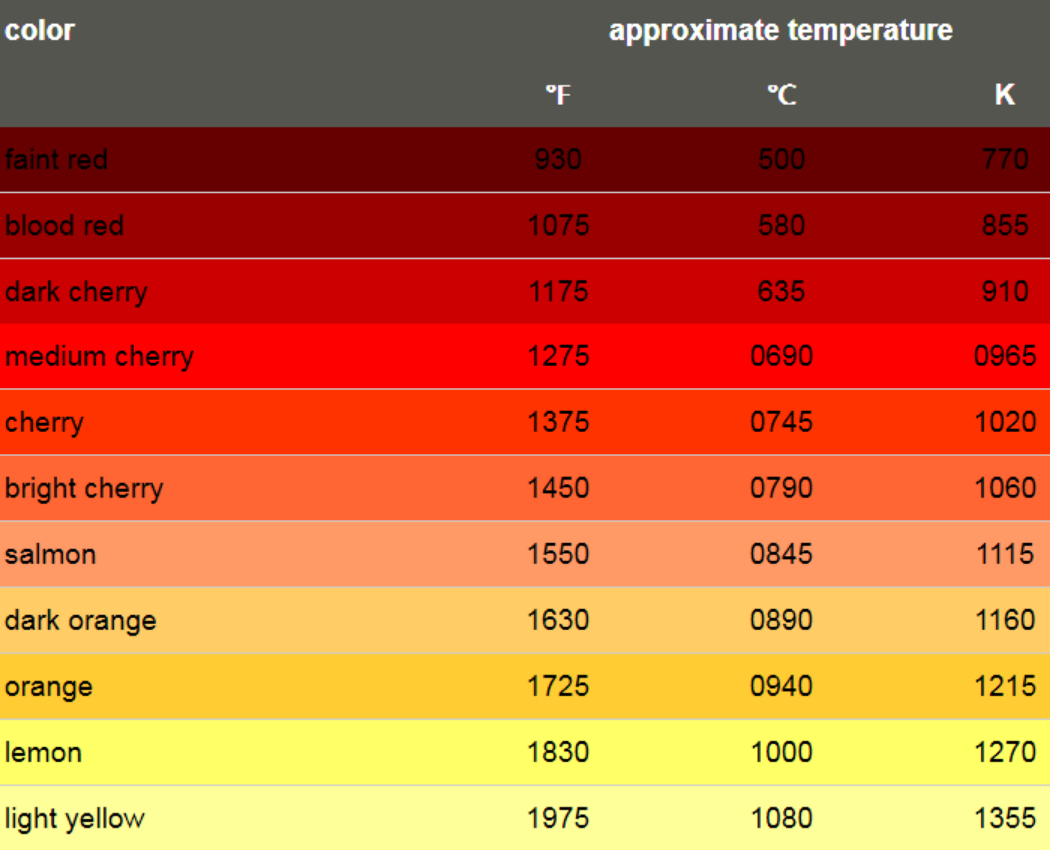
Smart TC- Whenever you attach an atomizer that has TC capable wire, it scans and asks you if you want to use Smart TC. I’ve tried it with SS and selected yes. The Swag 2 did a pretty good job in Smart TC. I noticed a slight pause when hitting the fire button. But every time I’ve used TC with other mods, I’ve noticed that slight delay. It’s only a split second and nothing annoying. I couldn’t find out how to adjust the preheat wattage in this mode. It performed well enough I guess but I’m not a TC fan.

DIY Mode- This has several modes when you click on it.

  • VW variable wattage(Soft, Normal, Hard)

  • VT which is regular Temperate Control (SS, Ni200, Ti, TCR)

  • CCW or Wattage Curve

  • SP or Super Player (for use with low resistance I guess)

  • BP or Bypass. This is direct output.

The NRG PE subohm tank-

The tank is another in the long line of NRG tanks. They use Vaporesso’s GT series coils (Baby Beast coil compatible). Its 25mm wide and holds 3.5mls of eliquid. The drip tip and filling port are both reminiscent of the Cascade. The drip tip is a 510 wide bore that slips nicely over a small circular ridge. The top pivots to reveal the fill port. The gasket inside is serviceable. The top part is reverse threaded and comes off. The airflow control is knurled. It’s pretty nice, slides smoothly, and theres a stopper.

Coils-

The Swag 2 kit comes with two different coils. One for using in the 50-70W range and another to use much lower 25-35W.

GT4 Mesh .15Ω (Best: 60-70W)-

This is a dual mesh coil. I liked using it well below the reccomended best at 50-55W. The flavor is really good. I’ve been using BB styled coils for years. I’ve tried a lot of different types and brands. These very well could be my new favorites. They also work well for direct output. They’re just really good coils IMO. Before this I didn’t even know there was a dual mesh GT coil.

The wicking material isn’t stated and looked a bit different. The cotton inside coils is usually white. This coils wicking looked a bit red-ish. I haven’t asked but I can only assume its some kind of blend. Cotton blended with wood puld, tea fiber, flax paper, and even sea weed have become a thing in these coils. They’re trying all sorts of stuff to get the best flavor and vaping experience. Whatever they used in the GT4 Mesh coils, I like it a lot.

GT CCELL .5Ω (Best: 25-35W)-

This is a SS wire coil encased in porous ceramic. That part is then surrounded by cotton on the outside. The mod scans this one and recognizes the SS wire and asks if you’d like to use Smart TC. I just used it in wattage mode at 30W. The flavor is really nice, but definitely not as good as the GT4 Mesh. This opinion might be due to the fact that I vape well above 30W regularly. What the GT CCELL is great at is liquid consumption. A tank full lasts a very long time with this coil. Ceramic coils are also supposed to last much longer than regular cotton wick’d coils.

Thoughts and conclusion-

I’m not going to do pros and cons with this kit. The pros outweigh any cons I could think of by a lot. The mod is PACKED with features and I probably forgot to mention a lot. The tank is a pretty good one but the mod is the star of the show. The new Axon chip they’re using is definitely a real good one. There’s tons of GEN fans out there and this is like the single battery version of that. Truthfully, I’m a set and go wattage vaper most of the time. This does that really well.

It’s probably the nicest compact mod I’ve ever used. Not only the best Pico styled mod but nicest single 18650 mod I’ve ever used. Being compact, light weight, and having great performace are things I value a lot. It’s very pocketable but also has a really classy look and feel to it. Like I said, I probably forgot to mention a bunch of things. I never tried to update or charge it through the micro usb port. I’ll post the specs below.

Vaporesso Swag 2 Mod Specification:

  • Dimensions: 75 x 50 x 25mm

  • Resistance Range: 0.03-5 Ohm

  • Output Range: 5-80W

  • Charging Current: DC 5v/2a

  • Battery: 18650 (not included in the kit)

  • 510 Connection

  • Max Tank Diameter: 25mm

  • Display: 0.91" OLED Screen

  • Chipset: AXON Chip

  • Micro USB Charger

  • Pulse Mode

  • Smart TC Mode

  • Eco Mode

  • DIY Mode

  • Rubberized fingerprint and scratch-proof finish.

Vaporesso NRG PE Tank:

  • 25mm (w) x 50mm (h)

  • Vape juice capacity: 3.5mL

  • Compatible with full GT Coil series.

.

Bonus (RBA) info-

I’m a huge RBA fan for subohm tanks. I like to collect them. I don’t think Vaporesso ever made a RBA for their Cascade Baby or NRG series of tanks. My favorite RBA for these styled tanks is the Smok V8 Baby RBA. The problem is, that particular RBA is taller than an actual coil. You need to find a taller glass for it to work in non-Smok tanks. I looked through my tanks to see if I could find one that’d allow me to use the V8 Baby RBA in my new NRG PE tank. I have lots of tanks and sure enough, I found one.

You can use a V8 Baby RBA in your NRG PE tank using a Uwell Nunchaku subohm tank glass

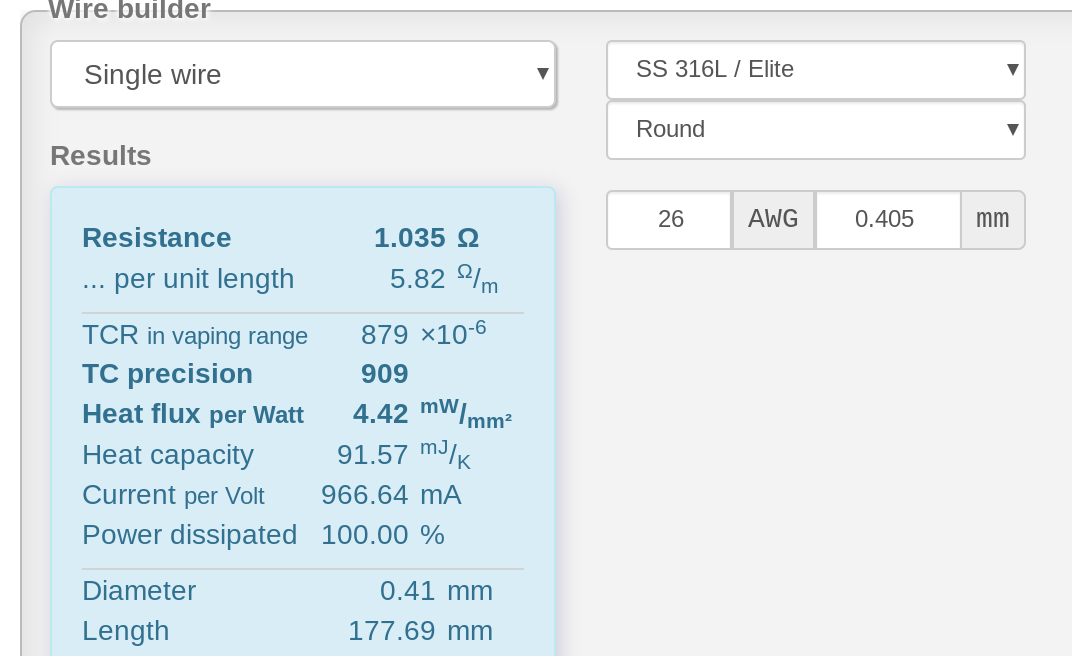
What’s great about the V8 Baby RBA is you can use simple round wire and get really good flavor. I experienced no leaking or problems at all. I’ll post a couple of pictures for evidence-

Picture #1

Picture #2

Big thank you to Vaporesso for sending me this kit and for also being patient. I’ve been using this kit for over a month and everythings held up fabulously. The mod has zero blemishes even though I’ve been using it a ton. I’m going to wrap it pretty much here. Feel free to ask me anything and thanks for reading if you did.

9 Likes

GREAT review @INOIROC. I agree the B/R colors combined with the “just what you need” display, put this in the keeper pile.

4 Likes

Thank you for the review. Not my cuppa tho.

5 Likes

One of my first real mods was an Eleaf Pico. I’ve been a big fan of mini mods ever since. I still have a bit of everything else, all the way up to 4x18650 or dual 21700 mods. It’s kind of a mixed bag at my house. The mods I have most of are probably dual 18650 though.

4 Likes

Yeah it really is a great little mod. I prefer simplistic displays over big touch screens and that stuff.

4 Likes

I received a Vaporesso Swag II around the first of this year (2020) from a pre-order across the Pacific. Chose the Black color - because while I like the Blue and Red colors, they (to my eyes) look like they got left on a heating element and started to burn around the bottom of the case. The Silver color looked like it (might) not looks so good if/when e-juice gets into those tiny indentations on the case. Dunno. Black works well.

The build quality seems really good. It is light as a feather, as compared to my Pico 25s, yet remains well balanced with a 5ML RTA mounted. Impressive in those respects - although a generalized Vaporesso mechanical issue was recently raised by Dan.

The user-controls are well built and functional, and the user-menu scheme is nicely implemented.

Much like with my digital cameras, it’s full of all kinds of “auto-brain” internal (and functionally rather mysterious in nature) control-modes that present (in marketing) as making usage easy for users. Just like I ended up ignoring most all of the trendy “auto-brain” bells and whistles on my cameras - in favor of maximal user-control of the core (photographic) parameters, I went straight to the “DYI” menu on the Swag II, and have to date only used the constant Wattage and constant Temperature mode functions (using SS 316L), ~1.0 Ohm coil, Rayon wick.

The constant Wattage mode has a glorified “preheat”, which helps to get things going (with coil-wick interface temperature) a tad sooner at the low ~5 Watt power level that I use with NETs. No user knowledge or control-ability regarding “preheat” power levels or duration.

The (DYI Menu accessed) constant Temperature mode (set for their pre-canned SS Temperature Coefficient) works better than my Pico 25s (which really FUBAR-up TC, IMO) - but appears to (perhaps) use a “soft” (rather than “abrupt”) “clipping-point”. I find that I don’t really like the scheme - because it makes things begin to seem to “get saggy” in ways that are more annoying than they are satisfying.

Oddly, when “burning” my 3mm diameter single coils between wick-installations, this mod (in either of the above modes) seems unable to (ever) warm the coil to glowing (unlike my Sigeleis and Pico 25s). Strange, indeed. It’s as if there operates some stealth power “governor”. This seems like (secret sauce) “paternalism” that I don’t want or need. Behavior is present in plain old constant Wattage as well as TC.

My final issue - relevant when trying to yield the most usable power from single 18650 cells - is that below ~3.5 VDC (and surely by 3.4 VDC), the ability of the device to do more than “choke and wheeze” crashes rapidly. The Battery Indicator states “50%” at ~3.6 VDC. Once the reading drops below around “40%” (at ~3.5 VDC), it’s basically “all over” for the (useful) battery discharge cycle. This behavior makes a significant difference (for me). My Sigelei 30W Minis and Pico 25s are both usable to 3.3 VDC, and Sigelei 30W Minis can automatically switch to “Bypass” output from PWM output (in order to supplement PWM mode at the “bottom end”) and are able to work down to 3.1 VDC. Useful in a pinch !

One last issue is that while I can actually make-out what is displayed on my Pico 25 display-screens (without reading glasses), this is not the case for the Vaporesso Swag II display-screen. Tiny numbers.

So, after this one Swag II, I decided to (instead) stock-up with an extra (and more adjustable) Pico 25.


Source: https://www.vapourcore.com/user/products/large/swag2m%20blk.jpg

3 Likes

A thorough review, thanks for the info. You’ve got me thinking about it. I’m starting to dig these mini-mights. If it can deliver what you need, the smaller the better.

6 Likes

Looked again at the Swag II when “burning coils” - and need to revise my statements (quoted above).

In constant Wattage mode, I can make my (SS 316L, ~1.0 Ohm, 13-turn of #26, 3mm diameter, 5mm length) coil “glow red” at a 6 Watt setting. This kind of behavior is about the same as my other mods.

However, using the constant Temperature mode, with Power set at the same 6 Watts, I cannot get the same coil to similarly glow - even when the Temp Max is set to 300 C ! Using “traditional” SS Coefficient of “91”. What temperature(s) do you (guestimate) that your (similar coil-mass), SS 316L coils glow at ?

2 Likes

Thanks for your review @INOIROC :smiley:

5 Likes

I’m pretty sure it’s 92. That’s what I’ve used for years.

3 Likes

Is there any reliable source where they have graphs or tables with this info per material?
Steam-engine still says 88 and DJLSB says 92…
Funny that even after all these years, there’s still no consensus between various “trusted sources”

If anyone has the proper equipment to test, this is the formula by the way
image

4 Likes

Now my brain hurts, guess that’s why I stick to Watt mode🤪
image

9 Likes

I looked into what is around on SS (316L) Temperature Coefficient. My impression is that the differences between those two sources that you (and others) have noted likely has to do with the Temp Co (a linear slope approx.) being a (decreasing) function of Temperature. Thus, some averaged value might be best.

Listed in Parts per Million (PPM) change in Resistance value, Temps shown are in Degrees C:

Temp Domain ------------------ Temp Coefficient

0-50 --------------------------------------- 1009.8

50-100 ------------------------------------- 970.8

100-150 ----------------------------------- 893.2

150-200 ----------------------------------- 815.6

250-200 ----------------------------------- 757.2

300-250 ----------------------------------- 757.4

If one takes an (arithmetic) average between 0 and 200 *C, the result is = 922.4

If one takes a (geometric) average between 0 and 200 *C, the result is = 919.3

.

If one takes an (arithmetic) average between 0 and 250 *C, the result is = 889.3

If one takes a (geometric) average between 0 and 250 *C, the result is = 884.3

.
If one takes an (arithmetic) average between 50 and 300 *C, the result is = 838.8

If one takes a (geometric) average between 50 and 300 *C, the result is = 834.9
.

If one takes an (arithmetic) average between 100 and 300 *C, the result is = 805.9

If one takes a (geometric) average between 100 and 300 *C, the result is = 804.0

.

Note: Geometric averages listed derived from data from equally-spaced Temp increments (of 50 *C).

3 Likes

Some mods/chipsets will respond differently to a certain TCR number. I’ve done 88 thru 94. I have an old Smoant Battlestar that works best at 150 for TC. Go figure. DNA devices are nice because you can customize between TCR and TFR with a CSV generated by Steam Engine. But overall, at least for me, 92 is the happiest medium.

3 Likes

(For SS 316L), folks seem to improvise (the setting of that numerical constant) all over the place. That constant as applied is just a scale-factor in the feedback-error loop. If one sets the constant higher, then the system assumes that the wire TC itself is higher - and correspondingly reduces its own “loop gain” factor, resulting in a higher sensed coil-wick interface temperature being allowed before the servo-system acts to limit the coil drive Current (and the corresponding coil-Power dissipated, as calculated for the measured coil Resistance value). On my Pico 25 (TC mode), I have to crank that scale-factor value up to values into the several hundreds (in order to avoid the TC limiting kicking-in prematurely). Pico 25 TC is untenable below ~1.0 Ohm load, beginning to become semi-workable around ~1.0 Ohm.

That (Resistance) measurement value is affected by the TC scale-factor setting (as well as offset) - so one should “re-lock” the (room temp) coil-Resistance reference after changing the scale-factor setting.

2 Likes

We’re totally derailing @INOIROC’s review thread so apologies to him.
But Raven…I was looking at the screen cap you posted from Steam and am curious how you got it to display those numbers. I punched in the same variables and it gave me this…


Notice how the “TCR in vaping range” is different?

3 Likes

Dunno on the reason(s) for that difference, TZ. I thought that (perhaps) since I had changed the (web-page default) “temperature points” (in edit-able TFR list), they might be coming up with an (averaged) TC coefficient value based on the range of those (individual temperature) values. However, the value that the web-page returns remains the same (“TC precision = 882”) even when I change those input-values. That remains an interesting mystery. Will update if and when I may suss the reason(s) out.

Since the Vaporesso Swag II review posted covers its TC mode operation (as does my own posted info), I would think that (some) readers (might) find such matters to be of (some) interest to them.

4 Likes

Quora Page content found:

The intensity and the colour of the steel glow on heating has a broad temperature range. Dull red may indicate about 600 to 650 C and bright red may indicate temperature above 800 C …


Source: Know Temperature when metal glows red | Hearth.com Forums Home

Note: The above-linked web-page asserts that the relationship is independent of the particular metal.

4 Likes

Whenever I dry burn my coils, I always switch to either ‘Bypass’ or ‘Power’ modes, with max power of 22 watts. Once coil is cleaned, I switch back to TC, SS.

2 Likes

Though I’ve got liquid to be focussing on for a while yet while I try and accumulate as much as possible before October, I found actually go for a little kit like that: reminds me if the iStick Pico that shat itself just the other night.

And that sorta design is excellent as a pocket mod.

Wait, this review’s a fn year old!!

Still, I like that kinda mod after owning the Pico.

2 Likes